A team of passionate geniuses who created groundbreaking scaling solutions like PoS and Supernets, team Polygon is also known for creating a modular blockchain framework – Polygon Edge.
The primary idea behind Polygon Edge is to help developers and businesses easily & quickly create public or private Ethereum-compatible blockchain networks.
Even today, developers find it difficult to bootstrap a blockchain that allows them to configure vital parameters like block limits for transactions, setting consensus algorithms and many others.
This is where Polygon Edge offers a framework that makes it easy for developers to bootstrap or create a customized blockchain network.
What is Polygon Edge?
By definition, “Polygon Edge is a modular & extensible framework that helps you build Ethereum-compatible blockchains, sidechains, and general scaling solutions.”
It utilizes Istanbul Byzantine Fault Tolerant (IBFT) consensus to bootstrap new blockchains while providing compatibility for Ethereum transactions and smart contracts.
Other than this, Polygon Edge also offers Polygon’s inherent benefits like low gas fees, high scalability, bridging public & permission networks efficiently, robust security, and many others.
Since the legacy Edge client is no longer supported, developers are encouraged to transition to Supernets for ongoing support and development. Please follow our link for more, let us look at its fundamental architecture.
The Polygon Edge Architecture
If you’re aware of the web3 tech stack, you know that blockchain deals with numerous moving parts that are complex, to say the least. Understanding the architecture of Polygon Edge is important because it offers modularity which complicates the process even further.
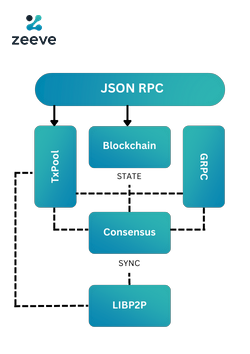
The following table will make matters easier for you.

At the bottom of the table is the base networking layer that uses Libp2p, an extensible, modular, and fast framework that offers a robust foundation for some of the advanced Polygon Edge features. Nodes interact with each other through this layer, which enables them to participate in complex processes like consensus and block syncing.
Ahead of this is the blockchain layer responsible for coordinating state transitions and block additions with other modules to ensure that the data is verified & committed to the chain.
TxPool is the central module for handling transactions and is local to each node. It handles transactions that are manually added or received from other nodes.
Node operators and decentralized app developers are often the first to interact with a Polygon Edge blockchain. By using the JSON-RPC layer, frameworks can interact easily with the blockchain.
At last, Node operators can use commands to talk to the Polygon Edge node, which operates on gRPC, making the user experience seamless and fun.
Deploying Blockchain with Polygon Edge:
Installing Polygon Edge:
There are multiple methods for installing Polygon Edge. But it’s recommended that we use pre-built releases from official GitHub. The latest one is v0.6.1. Once done, place it in the local instance ‘PATH’.
Now set up AWS SSM or GCP System Manager for Polygon Edge using
'polygon-edge secrets generate' command.Cloud Setup:
Step 1: Initialize the data directory on each node
Run the following command, and you will get the Node Id, BLS public key, and validator key for each of these four nodes. We will need the node id in the next part. Anybody with this key can impersonate you as a validator on the network. Hence, store it in a safe place.
node-1> polygon-edge secrets init --data-dir data-dirnode-2> polygon-edge secrets init --data-dir data-dirnode-3> polygon-edge secrets init --data-dir data-dirnode-4> polygon-edge secrets init --data-dir data-dirStep 2: Specifying The Boot Node
A boot node provides information about all other nodes in the network. You need to specify at least one boot node for your network. It should be more, actually. In case of downtime, the network will still be resilient. For this, you need to conform to the following multi addr format:
/ip4/<ip_address>/tcp/<port>/p2p/<node_id>The <ip_address> here will be reachable by other nodes. For cloud deployments, you should use a DNS hostname instead of IPs as a public or private node IP can change. So the multiaddr string will be:
/dns4/sample.hostname.com/tcp/<port>/p2p/nodeidThe <port> will be the default libp2p port 1478. This will enable communication with other virtual machines. And the <node_id> you have from the last step. So the final string will look something like this:
/dns4/sample.hostname.com/tcp/1478/p2p/16Uiu2HAmS9Nq4QAaEiogE4ieJFUYsoH28magT7wSvJPpfUGBj3HqConstruct the similar string for the number of boot nodes you want to keep.
Step 3: Generating the genesis file
Now, we need to generate genesis.json file using polygon-edge genesis command.
polygon-edge genesis --consensus ibft
--ibft-validator=0xC12bB5d97A35c6919aC77C709d55F6aa60436900:BLS_key
--ibft-validator=<2nd_validator_pubkey>:BLS_key
--ibft-validator=<3rd_validator_pubkey>:BLS_key
--ibft-validator=<4th_validator_pubkey>:BLS_key
--bootnode=<first_bootnode_multiaddr_connection_string_from_step_2>
--bootnode <second_bootnode_multiaddr_connection_string_from_step_2>
--bootnode <optionally_more_bootnodes>
The boot node id, validator public key, BLS key everything we have from the 1st step. Premined accounts, balances, block gas limit, and consensus mechanism should also be configured and included in the genesis block.
Now to export the configuration file in YAML / JSON format, run
polygon-edge server export --type yamlpolygon-edge server export --type jsonThe configuration file will be created in the same directory as default-config.yaml or default-config.json. You can edit this file to accommodate the validator node environment (file paths).
Step 4: Run all the client nodes
Now, we will use the configuration file generated from the last step to run the client nodes. Run:
polygon-edge server --config <config_file_path>So, for example, if the file path for node1 is </test/config-node1.json>, we need to run:
polygon-edge server --config ./test/config-node1.jsonOr, we can also run the following commands to set up a 4 nodes polygon edge network. Here also, instead of IPs, we have used a DNS address. The <–seal> flag indicates the nodes we have started will take part in block sealing.
node-1> polygon-edge server --data-dir ./data-dir --chain genesis.json --libp2p 0.0.0.0:1478 --dns dns/example.io --sealnode-2> polygon-edge server --data-dir ./data-dir --chain genesis.json --libp2p 0.0.0.0:1478 --dns dns/example.io --sealnode-3> polygon-edge server --data-dir ./data-dir --chain genesis.json --libp2p 0.0.0.0:1478 --dns dns/example.io --sealnode-4> polygon-edge server --data-dir ./data-dir --chain genesis.json --libp2p 0.0.0.0:1478 --dns dns/example.io --sealFor Non-validator nodes run the following command:
polygon-edge server --data-dir <directory_path> --chain <genesis_filename> --grpc-address <portNo> --libp2p <portNo> --jsonrpc <portNo>For example, you can add a fifth Non-validator client by executing the following command:
polygon-edge server --data-dir ./test-chain --chain genesis.json --grpc-address :500We can also use Polygon Edge ‘systemd’ using the ‘default–config.yaml‘ or ‘default-config.json‘ file to run the server automatically. Below is an example of a system configuration file:
[Unit]
Description=Polygon Edge Server
After=network.target
StartLimitIntervalSec=0
[Service]
Type=simple
Restart=always
RestartSec=10
User=ubuntu
ExecStart=/usr/local/bin/polygon-edge server --config /home/ubuntu/polygon/config.yaml[Install]Now run ‘systemctl start polygon-edge’ to start the service. Voila, you have successfully bootstrapped a blockchain with Polygon Edge.
Now check the log output and make sure there are no error logs. Call a JSON-RPC method like ‘eth_chainId’ to check the chain functionality.
Wrapping Up
If you want to increase efficiency, strengthen security, or prioritize decentralization, bootstrapping a blockchain is a way to go. When Polygon Edge makes it a seamless experience to bootstrap your blockchain, you are one step closer to your dApp goals.
That said, Zeeve has you covered if you’re looking for an all-rounder node deployment platform. We are a leading Blockchain infrastructure automation enterprise that supports all major protocols like Polygon, Avalanche, Binance, Polkadot, etc., and permissive protocols like R3Corda and Hyperledger Fabric.
So what are you waiting for?
Book a free developer consultation today, and make the most of Zeeve’s products & services.


