Before jumping into the technicalities of connecting the geth node with JSON RPC, let us understand what is geth node.
An introduction to geth Node
Ethereum nodes are the endpoints of the Ethereum blockchain network. These nodes are computers which had software that verifies, stores, & creates blocks. The client is the actual software that allows interaction with blockchain using JSON RPC API.
With the wide adoption of Ethereum, there are multiple Ethereum clients in the industry. Geth is one of the most popular clients in this domain. It is claimed to be the lightest, safest, and most secure Ethereum Client.
Benefits of using Geth
- Official client software by the Ethereum foundation
- In-built JavaScript console that exposes the Web3.JS API.
- Comes with an interoperable JavaScript client
- Considered a reference implementation for other Ethereum nodes.
Linking EC2 geth instance to JSON RPC
1- Linking EC2-
- Go to EC2->Instances->Launch instances
- Click on configure instance details ->Next: Add storage. (Ethereum nodes require approximately 905 GB of disk space at the time of writing)
- Click on Next->Add tags and Next->Configure Security Group. On this screen click on create a new security group. Change the inbound traffic rule to TCP port 22 for all the IPs
- If you want to configure external access to the nodes JSON RPC, TCP 30303, UDP 30303, TCP ports 80 & 443, TCP 8045 must be opened.
- Click on Review & Launch -> Launch.
- Create a new key pair & name it
- Download & save the key pair.
- Again, Launch instances.
- Change permission of key pair using chmod ‘400 keypair-ec2.pem’ command.
- Go to Ec2->launch instance. Copy the public IPv4 address.
You can now SSH into your EC2 using the command –
ssh [email protected] -i keypair-ec2.pem
2- Installing GETH –
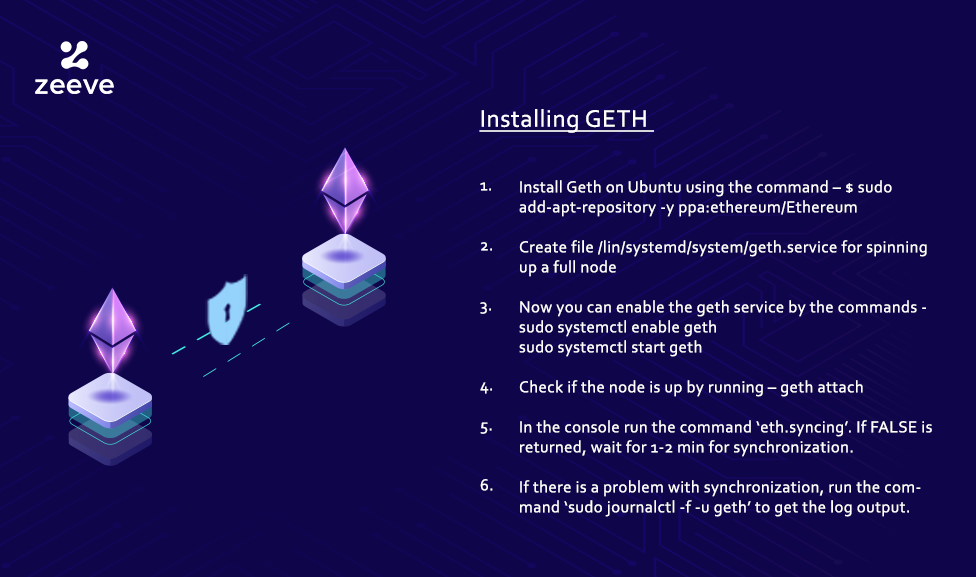
1- Install Geth on Ubuntu using the command –

2- Create file /lin/systemd/system/geth.service for spinning up a full node with following content.
3. Now you can enable the geth service by commands.

4- Check if the node is up by running

5- In the console run the command ‘eth.syncing’. If FALSE is returned, wait for 1-2 min for synchronization.
6- If there is a problem with synchronization, run the command ‘sudo journalctl -f -u geth’ to get the log output.
Note: Both true & false must be visible in the P2P network. If only false is discoverable, you need to publicly expose the TCP & UDP port 30303.
To check if the geth node is fully synchronized or not, go to the console and run the command ‘eth.block Number’.
3- Connecting to JSON-RPC:
Every console has its version of JSON-RPC. For checking the current block number, run the following cURL command:

To expose the API to the public we need to add proxy JSON-RPC traffic with NGINX. To do this, we need a domain. You also have to add a DNS record pointing to the EC2 instance IP. It is preferred to use an Elastic IP address.
Next, we need to install the necessary packages with following code:

Now, generate an SSL certificate and initial NGINX configuration by executing the command:

To renew the certificate, add the following command to /etc/crontab file:
Now you will see a welcome screen of NGINX.
The next step will be to generate HTTP basic authentication user and password:
Now you must edit the NGINX configuration file
/etc/nginx/sites-enabled/default with the following code:
To proxy traffic from an encrypted 443 HTTPS port to geth node port 8545, use the proxy pass directive.
Now verify the correctness of the config with the following command:
To apply changes, restart the NGINX process:
The default welcome page won’t be accessible. Use the following command outside your EC2 to check the connection secure HTTPS connection:
Once, this command is executed successfully, connect your browser Metamask extension to use your node for blockchain access. To do so, go to Settings>Network>Add a network.
Give your network name and in New RPC URL, input the full node connection URL in the following format:
Insert ETH for the currency symbol. Click Save and it is done.
This set of configurations only works for the Brave/Chrome version for Metamask. This is how you can link your nodes to your instances.
Connecting to the EC2 geth node using JSON/RPC is not a rocket science. However, if you choose Zeeve as your service provider, we will empower you to perform all the operations seamlessly and also save up to 97% of your time and 60% of costs.
About Zeeve
Zeeve supports over 30+ Blockchain Protocols, and our team has deployed and managed 4000+ nodes for our clients. Launch your geth node with JSON RPC with Zeeve now.


