Regardless of what type of Parachain you are building, testing it rigorously and optimizing various aspects is integral before moving the parachain to the production environment. You may need to test the chain under certain conditions to see its operational capabilities. For example, how many transactions the Parachain can process (TPS), how much storage, RAM, and CPU it will consume, how well the nodes are connecting with each other, how’s the connectivity with the Relay chain, and a lot more. One of the best and most recommended ways of testing your Parachain is by using Zombienet– a CLI tool designed to easily spawn and test Polkadot/Substrate based networks.
This guide explains the step-by-step process of testing Polkadot Parachain with Zombienet. Basically, we will discuss two ways of doing it– by using Zombienet CLI and Zeeve’s Larch– Zeeve’s Zombienet automation tool and GUI for effortless creation of a local Parachain testing network.
But before we begin, let’s quickly explore Parachains and their unique features for those who have just started exploring Parachains. This will give a fair idea of what parachains could add to your application.
Why are Parachains popular across web3 projects?
Parachains are popular because of their heterogeneous, multi-chain model that allows development of general-purpose or application-specific chains customized to suit specific needs of web3 projects and dApps. Parachains inherits security and computational resources from the underlying Layer-0 Polkadot ecosystem. Also, all the Parachain are connected to the Relay chain while running in parallel, to maintain interoperability between all the Parachains. Following are the unique benefits of Parachains:
- Enables creation of specialized L1 blockchains
- Flexibility in customizing various aspects of the chain, for example- TPS.
- Interoperability through native bridges.
- Ease of scaling for higher TPS, without the need of sacrificing security and decentralization.
- Does not requires users to pay platform fees as Parachains consume computational power from Polkadot.
- Freedom to offer a custom fee structure designed as per the project’s specifications.
- No need of bootstrapping their own validators or miners, Parachains leverage security from Polkadot.
- Easy to upgrade, fix bugs, and incorporate new features as needed.
- And, much more…
Key considerations for testing Polkadot Parachains with Zombienet
The following are the important things you need to consider before you test Parachain with Zombienet:
Compatibility:
Zombienet is currently compatible with Kubernetes, Podman, and native. However, the requirements for all three platforms are different. For example, Zombienet can work on any k8s cluster, but you must install kubectl to interact with cluster. As for Podman, Zombienet supports rootless as provider. The Native Zombienet provider allows nodes to run as local process in any environment.
Features by providers:
Each of the Kubernetes’ supported providers offers distinct features. For k8s, Zombinet use Prometheus operator for offloading the visibility/monitoring layer, allowing only the pods to be deployed. Whereas, with Podman, ZombieNet can deploy a couple of extra pods to add a layer of monitoring/visibility to the running network. Right now, native provider doesn’t run any extra layer/process at the moment.
Testing parameters:
Zombienet spawns a network to perform test against metrics, logs, and built-in functions upholding the network. For example, it will check if all the nodes in your network is running, is the defined parachain registered, or can the parachain produce atleast 10 blocks within 100 seconds.
Project types:
Zombienet is suitable for a range of projects using it for as a testing framework or integration. For example in Parity, the projects are CAPI, Cumulus, Polkadot in the testing pipeline, Substrate, Substrate Connect. Speaking about Polkadot, the projects are Acurast, Astar, Gossamer, Oak/Turing/Neumann, Hydradx, InvArch, Mangata, Manta/Phala, Moonbeam, and more.
Testing a Polkadot Parachain with Zombienet: Important steps to follow
Testing of a Parachain involves multiple steps, such as unit testing, benchmarking, runtime check, and debugging. With Zombienet test network, you can easily test a Parachain on several parameters to see if it functions as expected. Further, you can easily make changes to your Parachain setup (if required) because Zombienet creates a configurable local test network, which makes testing and optimization easy and simple.

For this guide, we will discuss two different ways of testing Parachain with Zombienet— the CLI method and low-code, automated process with Zeeve’s Larch.
However, as we know that Zombienet simulates a Parachain or Relay chain network once it is developed, considering all the configurations and parameters. Building a Parachain can be complex, engineering-intensive, and time consuming. Now, you can deploy your modular Parachain with ‘Wrench’— a no-code tool, optimized to launch custom Polkadot and Kusama Parachain devnet within few clicks. Learn more about Wrench.
Now, it’s time to discuss the step-by-step process of testing Polkadot with Zombienet CLI tool:
Option 1: Creating test network with Zombienet CLI
The Objective:
Creating a local testnet environment– Rococo with the following:
- Two validators; Alice and Bob.
- One Parachain.
- One collator.
Step:1 Getting the required binaries
Zombienet CLI is compatible with binaries, Kubernetes, docker, and more. For this article, let’s setup Zombienet for using binaries.
For this, you first need to create a bin folder that will hold your binaries. Use the below command for this:
mkdir bin The first binary you need is Polkadot, which will spin up the relay chain.
Use the following command to clone the Polkadot:
git clone https://github.com/paritytech/polkadotcd to the repository and checkout the latest Polkadot’s release and compile it, use the below command for this:
git checkout release-v0.9.32
cargo build -release
That’s done! You have a Polkadot binary now.
Next, you need substrate-parachain-template binary that will spin up the Parachains:
Use the following command to clone substrate-parachain-template binary:
git clone https://github.com/substrate-developer-hub/substrate-parachain-templatecd into the repo, check latest Polkadot release, and then compile:
git checkout polkadot-v0.9.32
cargo build -release
Now, you have a Parachain collator binary. Copy this binary to your bin folder, use the below command:
cp ./target/release/parachain-template-node ../bin/parachain-template-node-v0.9.32Now that you have all the required binaries, let’s create a Zombienet network.
Step:2 Setting up local test network with Zombienet
A Zombienet network requires configuration. Hence, you need to create a configuration file– .toml file.
touch config.tomlBasically, we are defining a local Rococo network with two validators and a Parachain. Both these validators will use default image, argos, and commands. Below is the example of .toml file:
[relaychain]
default_image = "docker.io/parity/polkadot:latest"
default_command = "polkadot"
default_args = [ "-lparachain=debug" ]

chain = "rococo-local"

  [[relaychain.nodes]]
  name = "alice"
  validator = true

  [[relaychain.nodes]]
  name = "bob"
  validator = true

[[parachains]]
id = 100

  [parachains.collator]
  name = "collator01"
  image = "docker.io/parity/polkadot-parachain:latest"
  command = "polkadot-parachain"
  args = ["-lparachain=debug"]
If you are using Kubernetes, spawn the network simply by using:
./zombienet-linux -p kubernetes spawn examples/0001-small-network.tomlOr simpler, because Kubernets is the default provider:
./zombienet-linux spawn examples/0001-small-network.tomlNow, you will see that zombienet starts creating the resources needed to launch the network. Therefore, a list of nodes will appear at the end, allowing you to connect to any of the nodes.
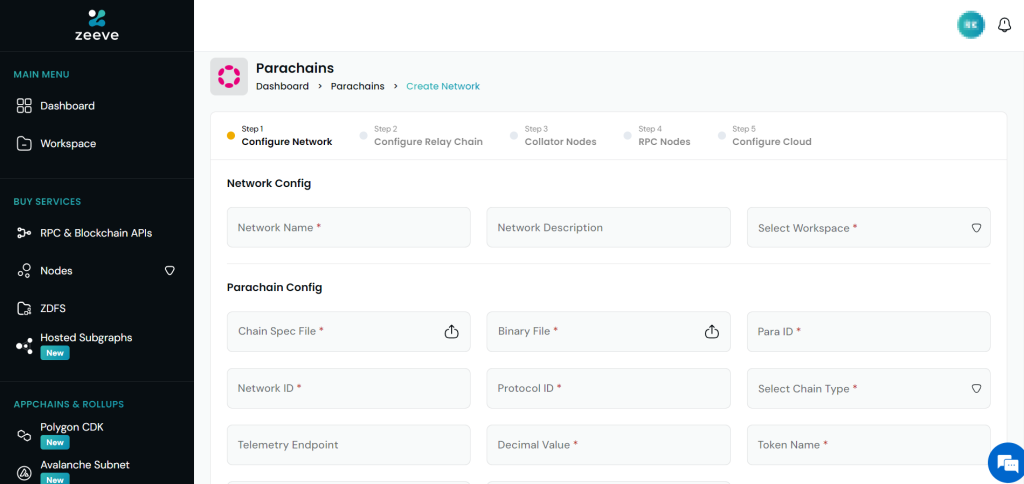
Option 2: Creating test network with Zeeve’s Larch- Zombienet automation tool (the low-code way)
Larch is a innovative GUI frontend designed to automate creation, management, and testing process of Zombienet network. Using Larch’s comprehensive dashboard, developers can quickly setup relay chains and parachains just in a few clicks, with no need of manually writing command lines or creating .toml or .yaml files.
Below is a step-by-step process of creating local test network with Zombienet. While these steps are curated for Linux OS, you can refer to Larch’s prerequisites for using Mac.
Step:1 Get the Larch binary first. You can download it from release or build from scratch by yourself.
Step:2 Install Podman/Kubectl as per the instructions as it will allow orchestration of Zombinet network.
Step:3 Assign execute permission to Larch binary, use the below command:
chmod 755 larchRun Larch binary using this command:
./larchStep:4 Navigate to http://localhost:9000 and click on ‘Network Template’ button given at the top.
Step:5 Label this template as ‘sample template’ (or whatever you want). Here, you can choose Podman or Kubernetes based on your setup. Click ‘Next’ to continue.
Step 6: Head to the Relaychain Configuration to populate the Nodes subsection. Add “alice” as name and then select the ‘Validator’ option. Press + button, to add a new node. Insert “bob” as name and choose ‘Validator’. Again, Press Next.
Step 7: Move to the Parachain Configuration an tap on the ‘+‘ button. Set the Parachain ID to 100 (or a number of your choice). Name the collator as “collator01” and ‘polkadot-parachain’ as command. Click ‘Next’ to continue.
Step 8: For this tutorial, we are skipping HRMP. Hence, click ‘Next’.
Step 9: In the Test Configuration section, you can make required configurations in the pre-filled sections and store the template by clicking at ‘Save’.
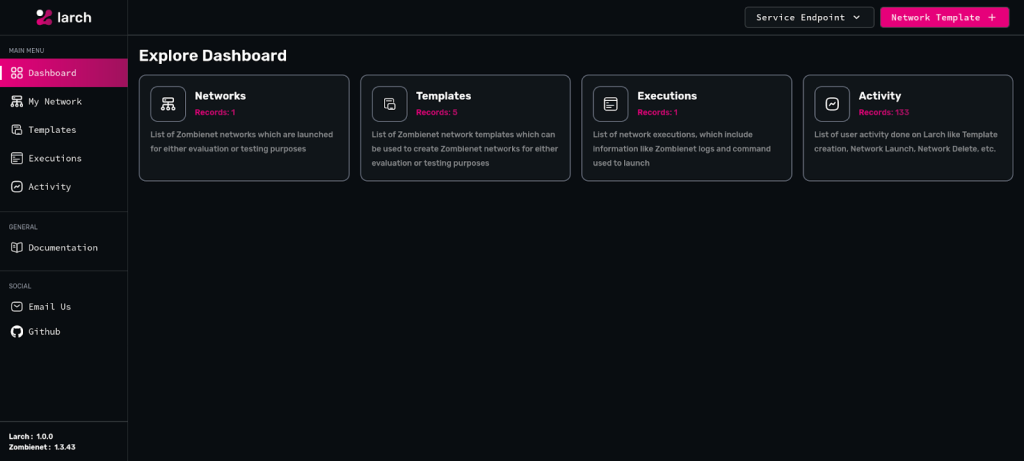
Step10: Go to the Templates page and select ‘Create’ to initiate the network creation. A dialogue box will pop up where you need to input the network’s name and ‘Confirm’ to start the orchestration. Now, Larch will transition you to the networks page while the network is in the creation state.
Step 11: Tap on ‘Eye” icon to inspect commands and execution logs. Also, you can click ‘Command’ button to see detailed command and metadata. To see logs/outputs, click the ‘Output’ button, which will open another modal revealing the streams.
Upon this, Zombienet network creation will be completed.
Step 12: Also, you can see metrics of your deployed network from ‘My Network’ page by tapping on the ‘Monitoring’ icon. You will be redirected to the Grafana service. Now, open the dashboard from ‘General’ folder and inspect metrics.Learn more about Larch’s features
Let’s wrap up!
As discussed, creating a Zombienet network via the traditional method involves writing commands and compiling JSON, .yaml, and .toml files. This will demand time, resource, and development expertise. With Larch, developers get a GUI interface for Zombienet creation that enables quick simulation and configuration of the local Parachain testing network in a few clicks. If you want to gather more details about Larch or other Zeeve’s solutions like Wrench or Polygon CDK, feel free to connect with our experts. You can schedule one-to-one meeting with them or drop us your queries via email on this page.