As a truly decentralized, fully-sharded, and multi-chain blockchain Layer-0 protocol, Polkadot has been enabling the development of innovative and highly feasible Layer-1 and Layer-2 solutions in its ecosystem. These one-of-a-kind features of Polkadot encourage worldwide institutions and web3 investors to become the Network’s validators. However, setting up and running a Polkadot validator node is a bit complex. This guide presents end-to-end instructions for a quick, low-code Polkadot validator node deployment, making it easy to join the Network’s validator set, validate on-chain transactions, and earn exciting rewards. Let’s start off!
Understanding Polkadot’s Validation Process
Polkadot adopts a nominated proof-of-stake (NPoS) consensus mechanism; hence validators’ eligibility on the Network are very specific. One can become a validator by running their validator node and stating their experience-related details to nominators in order to get their stakes. Thus, validators on the Polkadot network are accountable for managing their own stake and the stake they receive from nominators.
Polkadot mainly includes three types of validators;
- Parachain validators
- Relaychain validators, and
- Other validators
Para-validators are the Network’s participants who validate on the protocol’s Parachain phase and submit the candidates receipt to the Polkadot’s Relay chain so that further blocks can be added.
Relay chain validators, on the other hand, participate in Relay Chain’s consensus to review validity statements from other Polkadot validators and, thus, allowing block addition.
Talking about the Other Validators, they contribute to the availability distribution on the Network, which is like a double verification process to ensure proper allocation of para-validators for higher throughput and reduced latency.
Further, Polkadot appoints Nominators on the Network. Nominators participate in the validation process by providing their stakes to the preferred validators, forming a type of staking subsystem. Validators who aggregate higher staking from nominators’ are elected as active validators. Being a nominator, you do not need to run a validator node, but you can still indirectly participate in the Network’s consensus and earn rewards. However, a nominator must perform due diligence while electing validators for them. Any wrong selection will lead to slashing of their stakes.
All these provisions related to validators and nominators on Polkadot are made as per Polkadot’s Thousand Validators Program. However, every network is different in terms of approving validator nodes to run and participate in the consensus.
Read: Understand the Role of Validator Nodes — Everything You Need to Know About Validator Nodes: A Deep Dive
How to quickly run a Polkadot validator node?
Polkadot allows anyone with validator-specific skills to run a validator node and earn rewards. If you plan to run a validator node, you can do it using the conventional, programming-based approach of nodes either via source code, or Binary, and Docker Engine. Note that this process is difficult and it demands certain hardware requirements, considerable time, and resources plus extensive technical skills from you.
Alternatively, you can choose to deploy validator nodes through Zeeve’s low-code web3 infrastructure platform since Zeeve will arrange all the hardware requirements, deploy nodes in minutes, and not require you to possess technical skills. Plus, Zeeve will handle all the complexities related to the node with 24/7 node monitoring. The process of validating with the Polkadot validator node is of three steps:
- Setting up and deploying the node.
- Bonding the DOT Tokens
- Generating and submitting the Author Rotate key.
Two main steps of the above processes– node deployment and Rotate Key generation are done by Zeeve in minutes. Then, you need to access Polkadot’s stacking interface and bond your DOT tokens for the staking purpose. Let’s walk through the step-by-step process on how to deploy a Polkadot validator node on Zeeve and generate the session key. For this guide, we will understand the node deployment on the Westend Network (Polkadot Testnet). You can follow these exact instructions to run a node on Polkadot mainnet, Kusama, and other identical chains.
Read: How to Launch a Validator Node Without any Technical Complexity — How to run a Polkadot Validator Node(a no-code way)?
Now, let’s discuss all the above three processes involved in Polkadot’s validation process.
a. Setting up and deploying the Polkadot validator node
Getting started with Zeeve Platform
- Start your Polkadot validator node deployment on the Zeeve platform; create an account if you are a new user. Existing users access the portal by logging in with credentials assigned to them during signup. Upon successful login, go to ‘Validator Nodes’ under ‘Buy Services’ and select Polkadot Network to continue. A new page will open, asking you to select the number of nodes you want to deploy. The rest of the information, such as cloud type and node type, is set to Zeeve Managed Cloud and Validator by default.
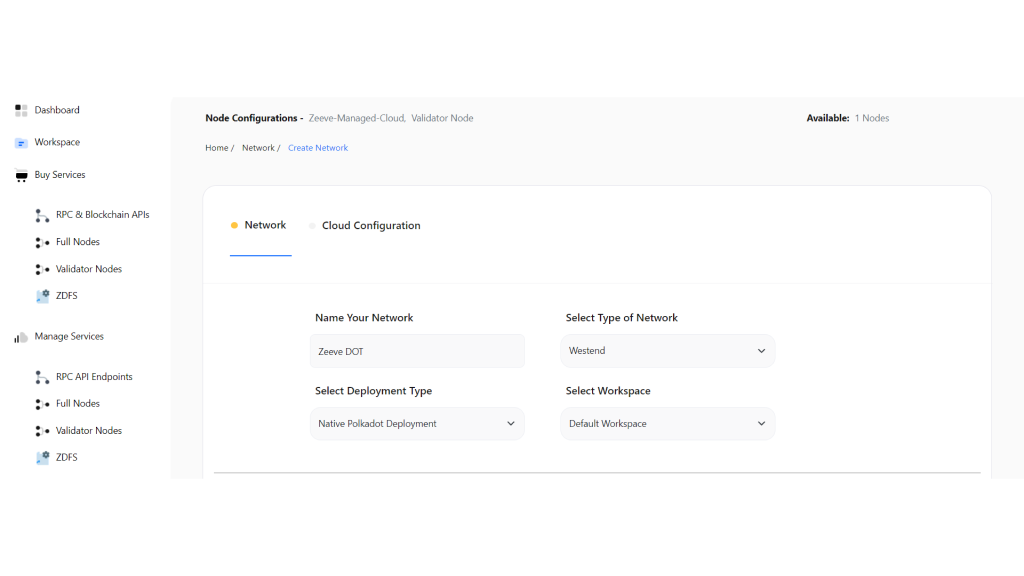
- After entering the number of nodes, click on the Subscribe tab and make a payment. Go to Managed Services→Validator nodes and create a new Polkadot network. Provide details like the Network name, network type – Westned Testnet or Mainnet (we’re choosing Westend for this guide), Deployment type– Native Polkadot deployment, and Workspace– Default workspace. Next, set a region for your validator node; for example, we have selected asia-east1.
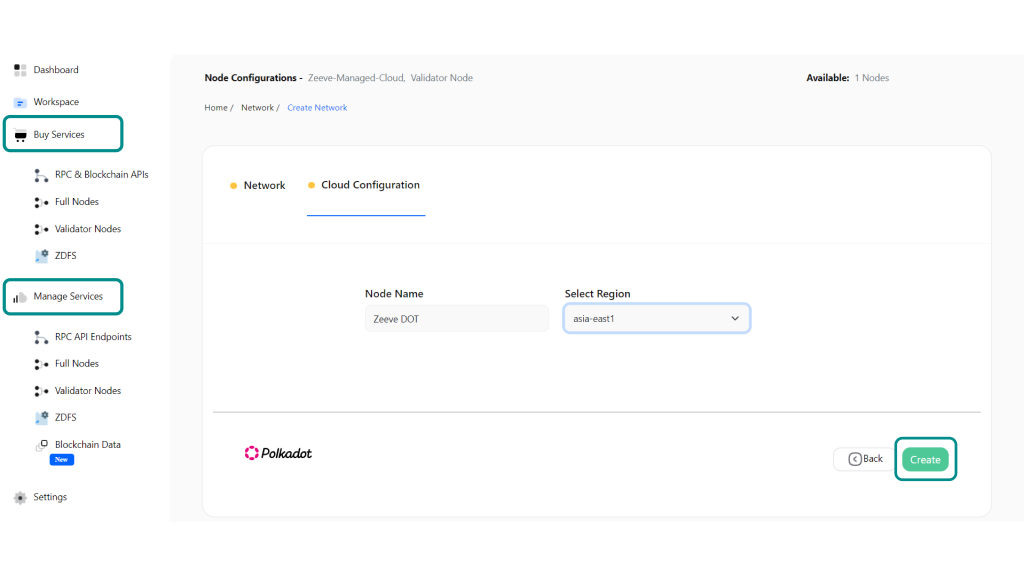
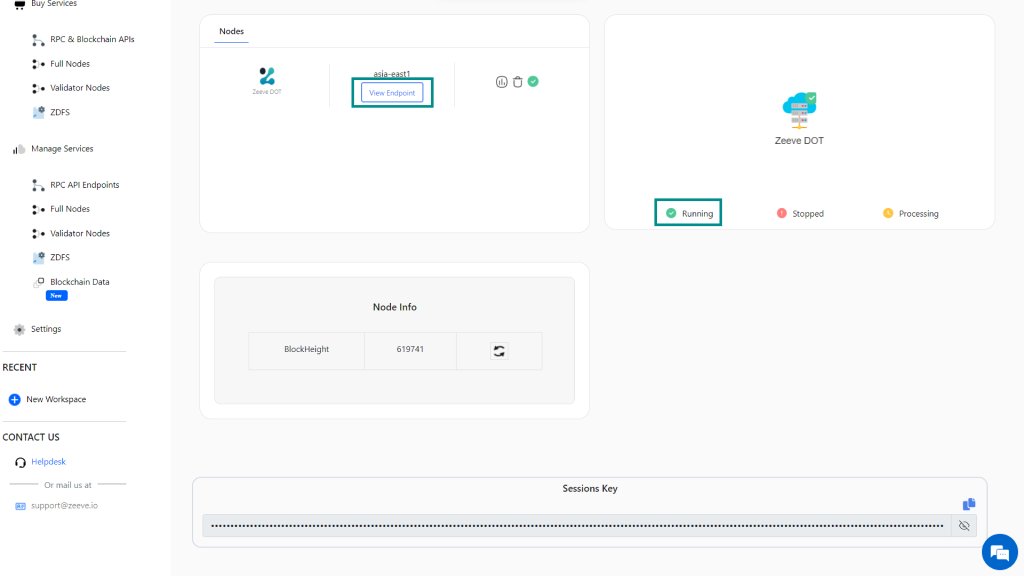
- Continue with ‘Create’ to create to begin syncing your node. Wait until the node synchronizes to the current or the highest block height. After some time, your node status will change to ‘running’, and a ‘Session key’ will be generated on the same page. You will need this key during the bonding/staking process.
b. Bonding DOT Tokens
Setting up Polkadot wallet
You need a Polkadot wallet with enough DOT tokens to bond. Install and set up ‘polkadot{.js} extension’ wallet, a Chrome extension that works similarly to the web3 wallet– Metamask. Now create your account and save the credentials, such as the secret phrase and passwords, to a safe place so you can retrieve these anytime.
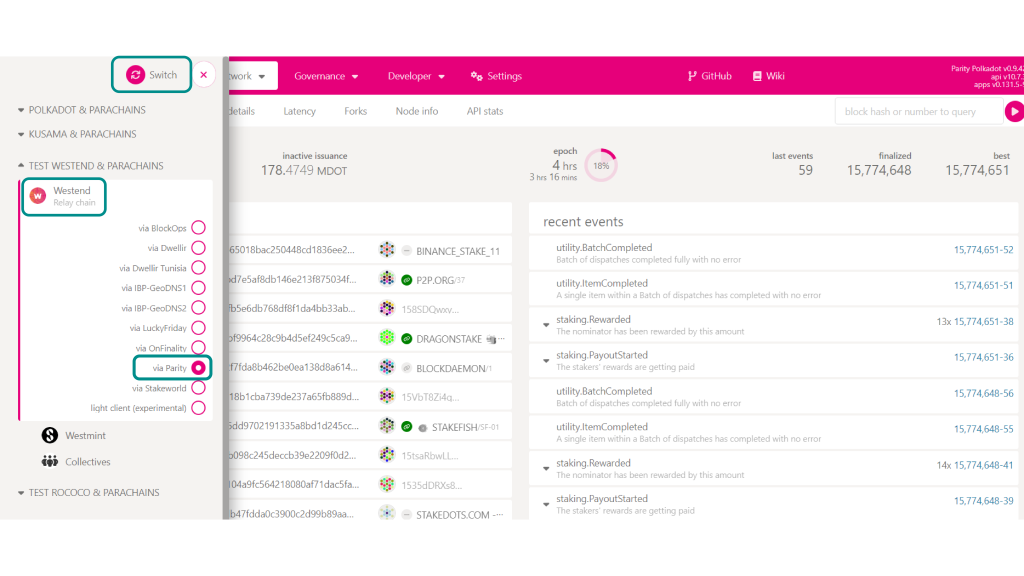
With Zeeve, this wallet works as a non-custodial wallet since we will not access the private key or other sensitive information. Rather, every process will be completed using the Session key. Thereby, you maintain full ownership of wallets, funds, and security keys, and we take responsibility for managing and upgrading underlying blockchain infrastructure, which you remain confident about your sensitive data’s safety and, most importantly, the funds. Connect this wallet to the Westend Testnet. Login to your wallet, open polkadot.js.org/apps, navigate to Test Westend & Parachains and then Switch.
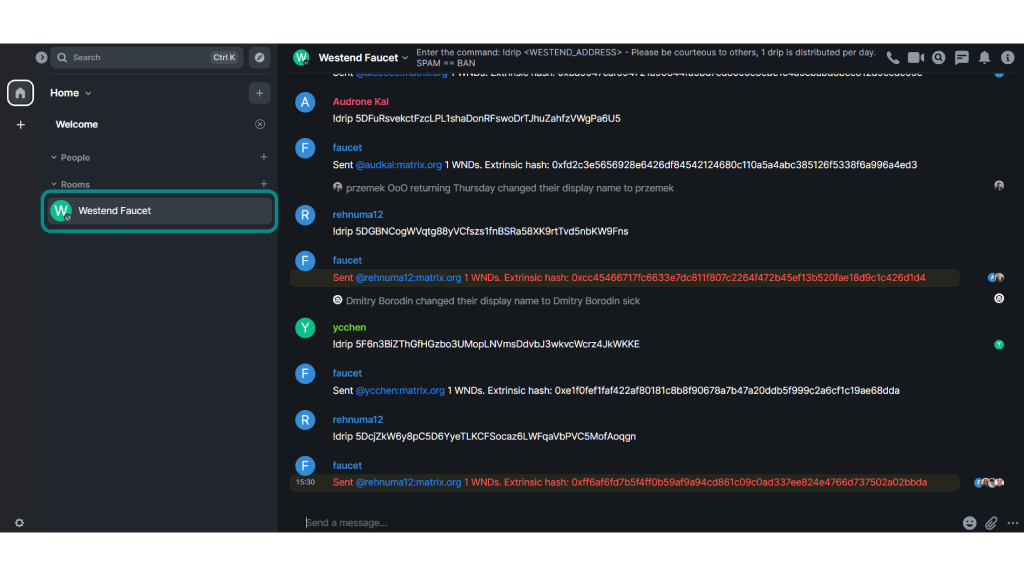
Go to the Westend Testnet at Matrix.org messaging app, create your account, and search for Westend Faucet. Type !drip <account/westend address> on the chat interface and 1 test token on each attempt will be transferred securely to your wallet. You will need to use these dummy tokens to bond tokens for the validation purpose.
To bond your DOT tokens, create separate accounts– Stash and Controller. Your Stash account is like a cold wallet that manages funding-related operations, for example, paying transaction fees. The controller account works like a hot wallet for managing all the non-funding activities, for example, initiating and ending the validation process.
Visit https://polkadot.js.org/apps/ → go to ‘Network’ → ‘Staking’ and navigate to the ‘Accounts’ tab located beside the Overview. Click on + Stash and set account extension for stash and controller account. Ensure you keep enough balance on the Stash account, as this will slash DOT tokens for the sake of network security if you do not perform the validators’ responsibilities as expected, such as offline or doing any malicious action.
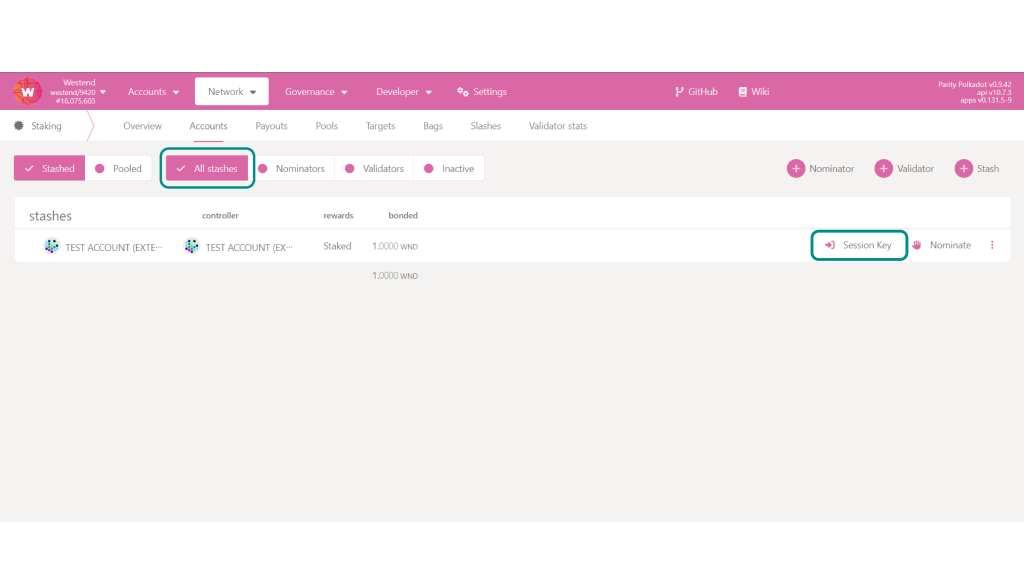
As you can see in the below image, we have added “TEST ACCOUNT” as the Stash account and “TEST ACCOUNT 1” as a Controller account. The value bonded is 1 DOT, on chain bonding duration, is 12 hrs, and the payment destination is Stash account. All the recurring validator rewards are sent here.
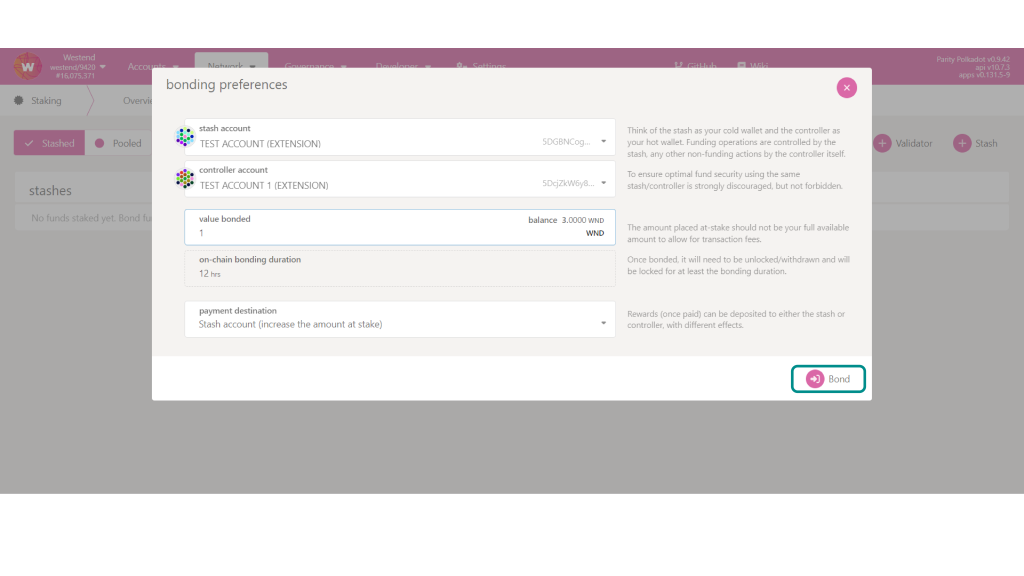
Once you fill in all the details, click ‘Bond’, and a new page with account details will open. Click on ‘Sign and Submit’ and then enter the password for your Stash account (Test Account in our case) and sign the transactions. You can see the bonding account and details across the ‘All stashes’ section by navigating to the Staking→ accounts→ stashed.
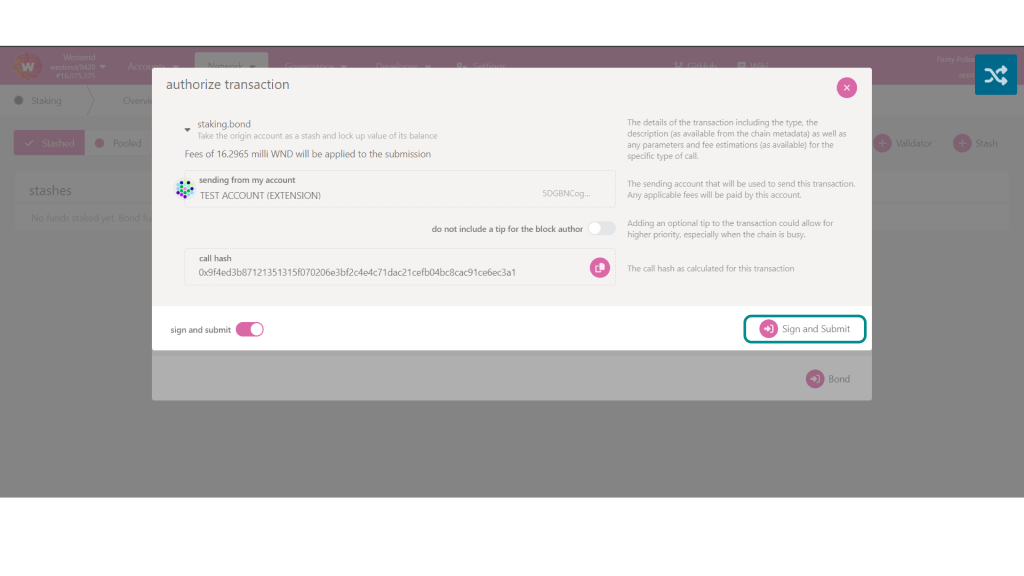
c. Submitting the Session key
Next, submit the session key generated through the Zeeve platform in the 3rd step. Go to Staking —>Accounts, and click “Set session key”. Upon adding the key, you will see a page similar to the one below with account details and call hash; click “Sign and Submit” and then enter the password to finish bonding.
Congrats! Your Polkadot node is now ready to perform validation.
Validating the staking node
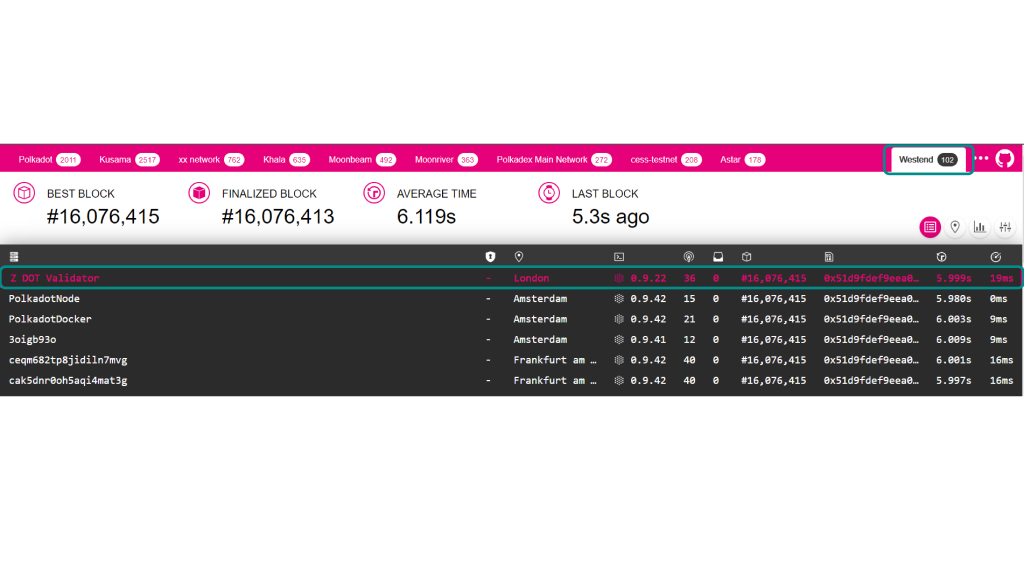
To ensure your validator node is live and properly synchronized, navigate to the Telemetry, and head to the preferred network- testnet, Kusama, or mainnet. Next, search for the name of your node. Z DOT (Zeeve DOT) is the name of the node we deployed, which is active and running on the Westend Network as you can see in the image below. Likewise, you can search and validate your node.
Node performance monitoring
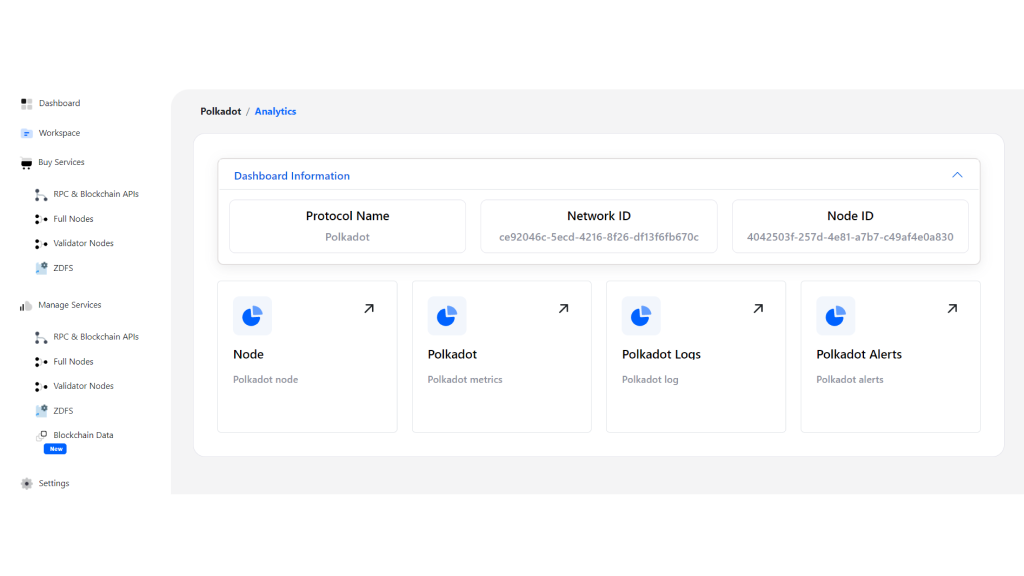
Zeeve guarantees the sound health of your Polkadot validator node by offering 24×7 resource monitoring, cloud resource analysis, and logs. The platform comes with an integrated real-time analytics dashboard that you access upon clicking the “View Endpoint” in the above image. A new page will open showing analytics in four categories; Node, Polkadot, Polkadot Logs, and Polkadot Alerts, as visible in this image:
Let’s one-by-one understand all these node monitoring parameters:
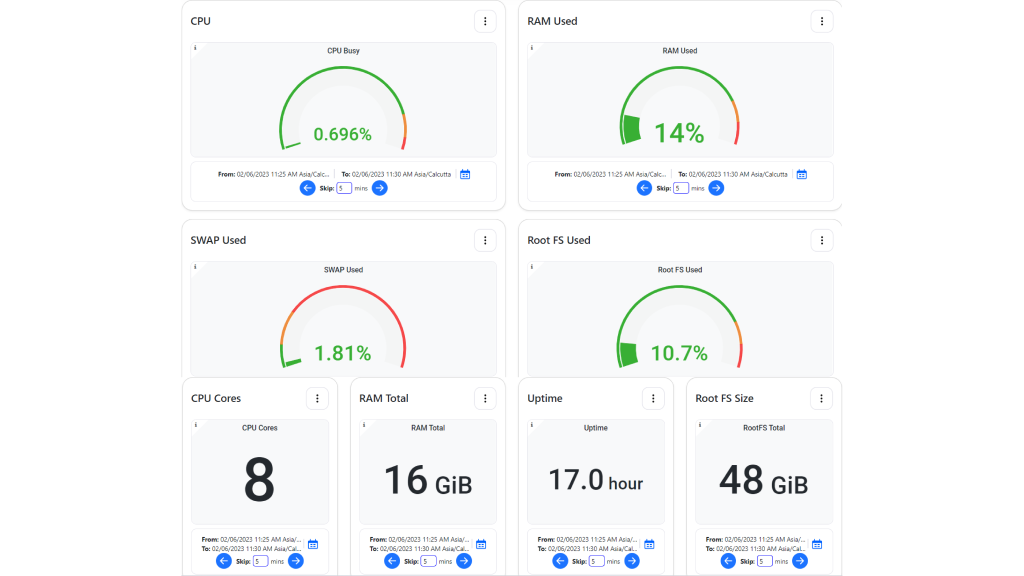
Node
This section displays your Polkadot node-specific analytics such as total CPU usage, RAM used, Swap, Root FS used. Also, the dashboard shows CPU Cores, total RAM, node uptime, and Root FS Size.
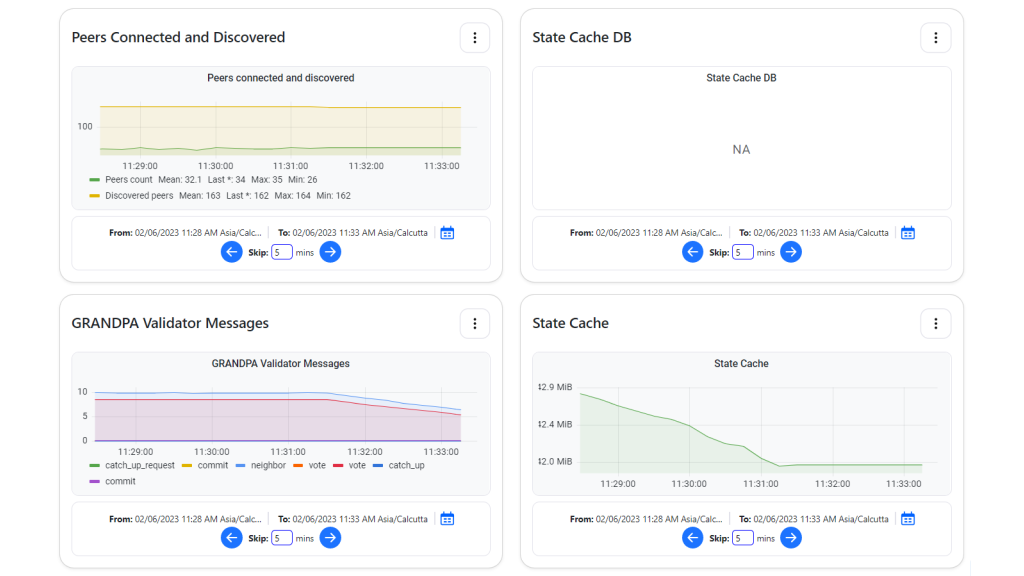
Polkadot
Access blockchain-level monitoring parameters to track the chain’s height, Bandwidth usage, Tasks rate, total connected peers of the network, GRANDPA validator messages (if you have deployed the node on Kusama), State Cache, and more.
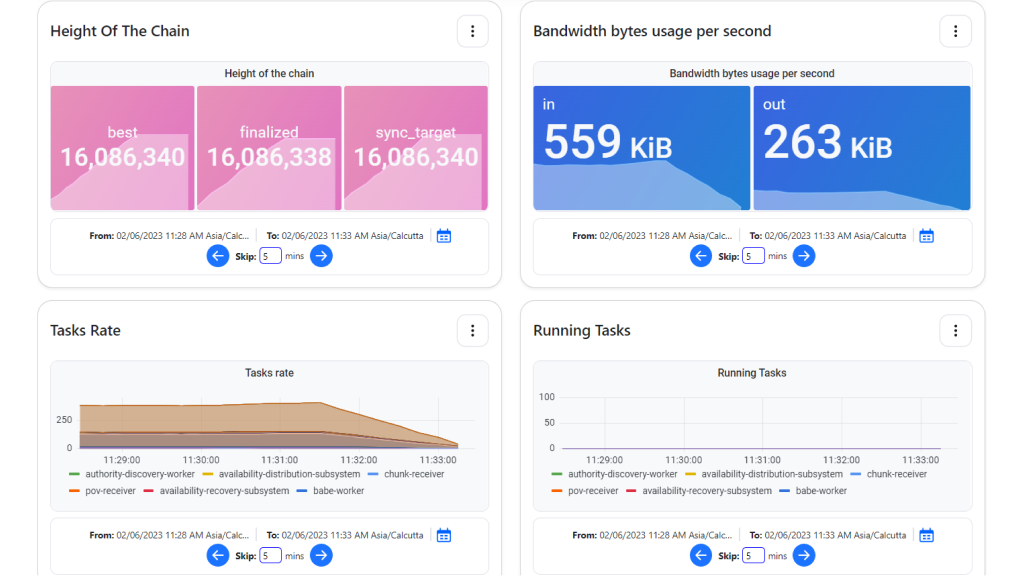
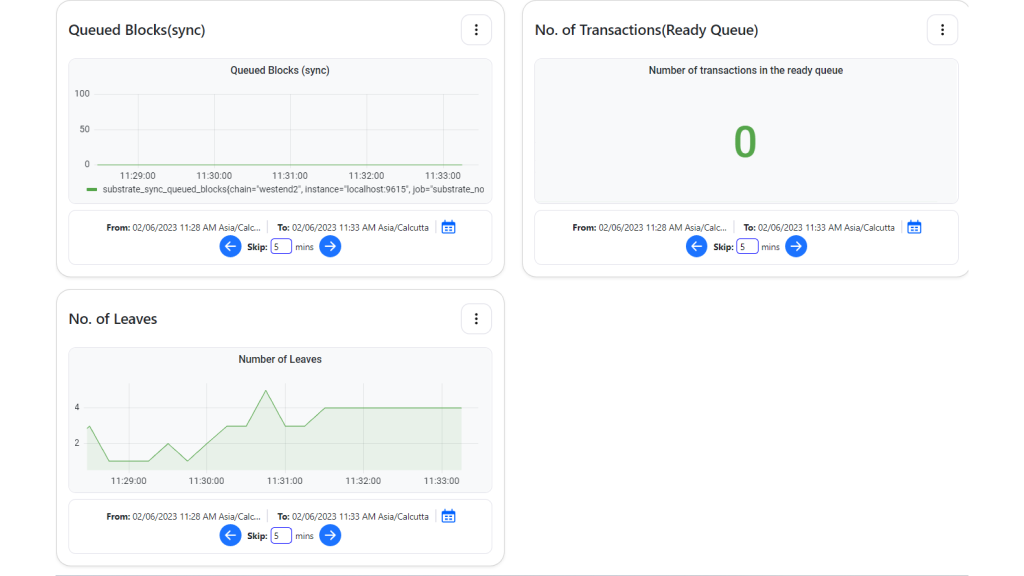
Additionally, you can see the total Queued blocks, no-of transactions, and leaves for detailed node monitoring.
Polkadot Logs
This section displays all the transaction logs related to your validator node.
Polkadot Alerts
From here, you can get all the real-time and predictive alerts about your node’s health status and critical alerts regarding the Polkadot Network.
Read: Launch your Polkadot Validator in Minutes — Explore Zeeve Polkadot Solutions
Finishing up
As mentioned, instructions in this guide represent Polkadot TestNet deployment. When deploying a node on the Polkadot MainNet, you may need to wait for a certain period to get approval for validating the transaction on the network. Rest assured, your node deployed on Zeeve’s robust node infrastructure is always secure, up and running with no downtime. We provide unmatched node-as-a-service to enterprises, startups, scaleups, and independent developers, allowing them to walk away from the difficult part of node deployment and focus on other important aspects of their projects.
Know more about Zeeve’s validator node offerings and how Zeeve can simplify your node deployment journey . Also, you can connect with our web3 consultants to get help starting your nodes or discuss your project requirements in detail.