
In June 2019, Meta, the billion-dollar venture spearheaded by Mark Zuckerberg, announced “Libra.” What was supposed to be a revolutionary stablecoin, Libra, ran into regulatory problems, and a slimmed-down version of Libra, “Diem,” came into existence.
Folks at Meta were hopeful that Diem would take off, but in January of 2022, curtains closed on Zuckerberg’s dreams of launching a cryptocurrency, as Diem’s assets were sold for $200 million reportedly.
The fallout of these dramatic few years was a handful of battle-tested developers. These developers would come together to incept “Aptos” and in October of 2022, launch “Diem” – the Mainnet of Aptos.
Ever since its inception, Aptos has been turning heads with its rapid growth, raising over $350 million in venture capital investment and beating Ethereum and Bitcoin to grow at a rate of 500%. That said, Aptos is not just another cryptocurrency; it is a layer 1 PoS blockchain platform where users can build dApps, smart contracts, build blockchains using the Aptos SDK, and more.
Now that you understand the history of Aptos, let us learn more about this awe-inspiring platform, followed by how to deploy an Aptos node.
What is Aptos?
You may have already grasped that Aptos is an L1 blockchain, and it is traded under the domain extension “APT.” It was created with the principle of mass adoption, scalability, trust, reliability, cost-efficient, security, and continual upgradability.
With a total transaction of over 84 million, 104 active validators, and 840+ million APT tokens actively staked (as of February 8th, 2023), it is needless to say that Aptos has a strong foothold to grow exponentially even in a volatile market.
When such is the situation, developers, startups, and web3 ventures would be axiomatically interested in deploying Aptos nodes, and here’s where this guide comes in handy. Stay tuned until the end to learn about Zeeve’s robust blockchain node deployment practices.
Without further ado, let’s learn how to deploy an Aptos node, starting with the hardware requirements.
Hardware Requirements
Based on the official documentation released by Aptos, these are the recommended hardware resources to run a production-grade public full node. RAM of 32 GB and a 2T SSD are a must to carry out deployment operations smoothly.
- CPU: 16 threads, 8 cores, 2.8Ghz or more (Intel Xeon Skylake or newer, or similar specked system)
- RAM: 32 GB
- Storage: 2T SSD with at least 40K IOPS and 200MiB/s bandwidth.
- Internet bandwidth: 1 Gbps
To run the full node for development or testing:
- CPU: 2 cores
- RAM: 4 GB
- AWS
- c6id.8xlarge (if you’re using local SSD)
- c6i.8xlarge + io1/io2 EBS volume with 40K IOPS
- GCP
- n2-standard-16 (if you’re using local SSD)
- n2-standard-32 + pd-ssd with 40K IOPS
Running Ports
According to the official docs, these are the essential ports required for the process.
Port settings for the validator:
- Open the TCP post 6180 to allow the validators to talk to each other
- Open the TCP port 6181 to connect the validator full node
- Open the TCP post 9101 to share the metrics to validate the health statistics
- Ensure to keep the TCP port 6186 open for the local storage backup
Port settings for the public full node:
- Open the TCP port 6182 to allow the full nodes to talk to each other.
- Open the TCP port 9101 to send the full node metrics to validate the health stats (only required in the registration stage)
- Open the TCP port 80/8080 to access the REST API
- Keep the TCP port 6186 open for the local storage backup.
Deploying the node
To begin with, you are most likely on Ubuntu, so start by changing the directory to /home/ubuntu.
cd /home/ubuntuStep 2: clone the Aptos repo with the following code
git clone https://github.com/aptos-labs/aptos-core.gitStep 3: You need to cd into aptos-core directory with the below command
cd aptos-coreStep 4: To prepare your developer environment, run the script below
./scripts/dev_setup.shStep 5: Run the below code and update your shell environment
source ~/.cargo/envStep 6: Check the mainnet branch using the below command. You can use devnet or testnet instead as well.
git checkout --track origin/mainnetStep 7: Ensure that your working directory is aptos-core and then run the below command
cp config/src/config/test_data/public_full_node.yaml fullnode.yamlStep 8: Download genesis.blob and waypoint.txt for mainnet or testnet
- Genesis and waypoint for mainnet
curl -O https://raw.githubusercontent.com/aptos-labs/aptos-networks/main/mainnet/genesis.blobcurl -O https://raw.githubusercontent.com/aptos-labs/aptos-networks/main/mainnet/waypoint.txt- Genesis and waypoint for testnet
curl -O https://raw.githubusercontent.com/aptos-labs/aptos-networks/main/testnet/genesis.blobcurl -O https://raw.githubusercontent.com/aptos-labs/aptos-networks/main/testnet/waypoint.txt- Genesis and waypoint for devnet
curl -O https://raw.githubusercontent.com/aptos-labs/aptos-networks/main/devnet/genesis.blobcurl -O https://raw.githubusercontent.com/aptos-labs/aptos-networks/main/devnet/waypoint.txtStep 9: In the next few steps, edit the fullnode.yaml file in your current working directory, as shown below.
Step 9.1: Starting with specifying the right path to the waypoint.txt which was just downloaded by editing the base.waypoint.from_file in the fullnode.yaml . It will point to waypoint.txt by default in the current working directory.
base:
  waypoint:
    from_file: "./waypoint.txt"
Change it to
from_file: "https://bunny-wp-pullzone-nb318evfcx.b-cdn.net/home/ubuntu/aptos-core/waypoint.txt"Step 9.2: For the genesis_file_location key, provide the full path to the genesis.blob file.
For example:
genesis_file_location: "./genesis.blob"Change it to
genesis_file_location: "https://bunny-wp-pullzone-nb318evfcx.b-cdn.net/home/ubuntu/aptos-core/genesis.blob"Step 9.3: We can also change the data directory
data_dir: "/opt/aptos/data"Make the changes as and when needed.
Create the Binary
To build the debug binary, omit the –release flag and run the command below
cargo build -p aptos-node --releaseRun it like this or create a service as stated below
1. Run as CLI command
/home/ubuntu/aptos-core/target/release/aptos-node -f
/home/ubuntu/aptos-core/fullnode.yaml
2. Create Aptos systemd service
sudo vim /etc/systemd/system/aptos.service2.1. Write your systemd service
[Unit]
  Description=aptos
  StartLimitIntervalSec=500
  StartLimitBurst=5

[Service]
  Restart=on-failure
  RestartSec=5s
  ExecStart=/home/ubuntu/aptos-core/target/release/aptos-node -f /home/ubuntu/aptos-core/fullnode.yaml
  Type=simple
  User=root

[Install]
  WantedBy=multi-user.target
2.2. Enable and run it with these steps
- Enable
sudo systemctl enable aptos.service- Start
sudo systemctl start aptos.service- You can check the status by running
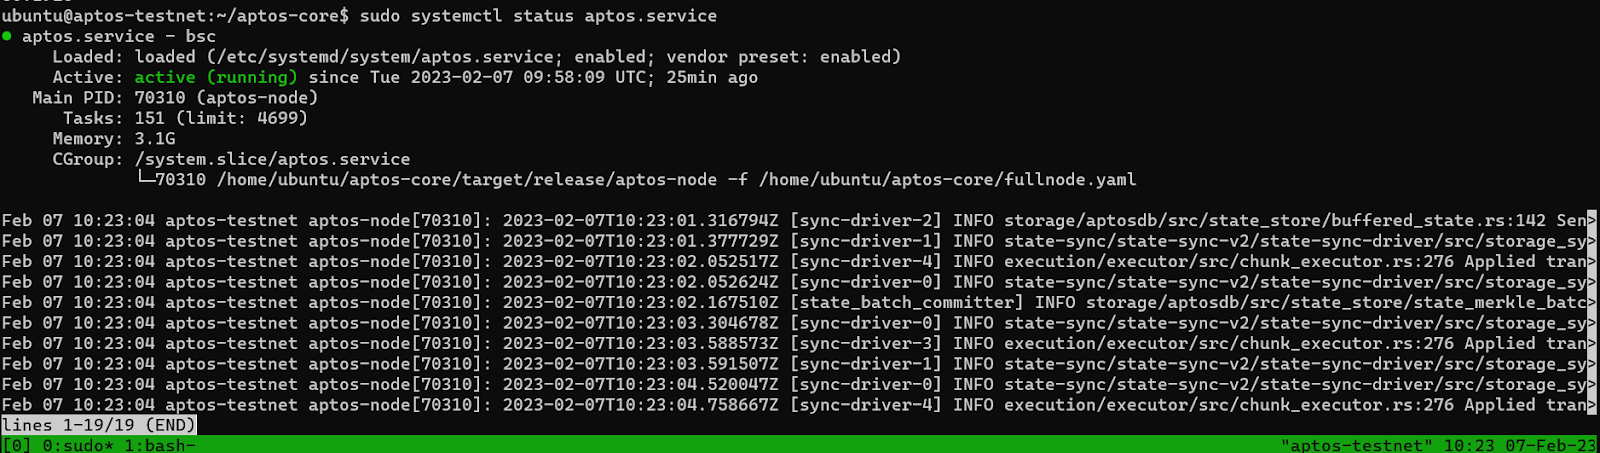
systemctl status aptos.service- Which should look something like this
- In the next step, you can check the logs by using
journalctl -u aptos.serviceChecking the status of the Aptos node
To check the status, verify the initial synchronization with the below command
curl 127.0.0.1:9101/metrics 2> /dev/null | grep "aptos_state_sync_version{.*\"synced\"}" | awk '{print $2}'
The command will output the current synced version of your node.
For example: 3242412
You can use the Aptos explorer site for comparison.
Verify outbound network connections.
Technically, the number of outbound network connections should be more than 0.
Run the following command to check:
curl 127.0.0.1:9101/metrics 2> /dev/null | grep "aptos_connections{direction=\"outbound\""
aptos_connections{direction="outbound",network_id="Public",peer_id="ddeb6033",role_type="full_node"} 4
Voila, once you successfully verify the outbound network, you have successfully deployed an Aptos full node with code.
Wrapping Up
You may either deploy any kind of Aptos node yourself or keep posted to Zeeve as we’re hard at work to deploy a “no-code” Aptos node deployment interface for you. When you deploy a node on your own, you inadvertently run into problems like errors in code, syncing to the network, verifying the deployment, maintaining uptime, etc.
But when you take the help of a robust node deployment platform like Zeeve, our DevOps engineers foresee the entire process of deployment, follow through with after-deployment support, ensure there is no downtime in the network, and not to mention – you will have the help of a seamless UI to keep your dApps and smart contracts up & running.
That said, Zeeve is a blockchain infrastructure as a service platform that not only provides a robust platform to deploy Aptos nodes but also for Ethereum, Polygon, Hyperledger Fabric, Avalanche, and all other major protocols.
We are the only blockchain platform to offer the “Bring Your Own Cloud” choices for all major cloud providers.
So, what are you waiting for? Book a free session with our expert today.