Hyperledger is gaining popularity, with prominent companies like LACChain, Poste Italiane, and Public Mint building innovative enterprise solutions on the top of its ecosystem. Knowing this, our previous articles on Hyperledger Besu have covered a dedicated developers’ guide, node deployment on Besu, and Ethereum node deployment on Besu. Adding more to the series, let’s discuss how to deploy a Hyperledger Besu network on Kubernetes. Over the past few years, Kubernetes is becoming the choice of most web3 developers and is highly recommended for Hyperledger-specific component deployment. Hence, let’s get started!

Why Kubernetes for Besu Network deployment?
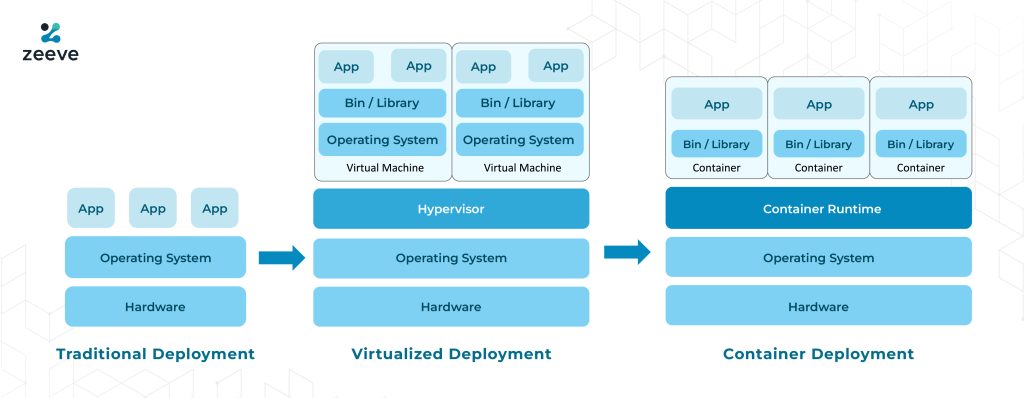
Kubernetes is perfect for Hyperperledger Besu deployment as it has awesome capabilities to manage, scale, and Orchestrate distributed networks. Kubernetes clusters offer a range of benefits over traditional and virtualized deployment (as explained in the below image), such as managing containerized services and workloads, declaratory configuration, and automation. For a production environment, containerized systems run the applications seamlessly and ensure no downtime. For example, if one container is in downtime, another container starts immediately and handles the network. That’s the reason why Kubernetes is gaining overwhelming popularity across the developer community.
Looking for other deployment methods than Kubernetes? Check this out:
How to create a permissioned blockchain with Hyperledger Besu?
Deploying a Hyperledger Besu network on Kubernetes: 9 Simple steps
Following is a step-by-step process to deploy a Hyperledger Besu network on Kubernetes. However, these are the instructions for private Besu network setup; you can deploy a public network by referring to Besu’s official documentation.
Prerequisites
- Create a local or cloud Kubernetes cluster.
- Clone the Quorum-Kubernetes repository.
- Install kubectl in your local machine to run commands against the Kubernetes Clusters.
- Install Helm3 to manage Kubernetes packages, widely known as charts.
- Ensure if you are able to connect to the cluster through kubectl
Upon successfully setting up a running cluster, you must verify that kubectl is connected to the cluster like below:
kubectl version
Client Version: version.Info{Major:"1", Minor:"23", GitVersion:"v1.23.1", GitCommit:"86ec240af8cbd1b60bcc4c03c20da9b98005b92e", GitTreeState:"clean", BuildDate:"2021-12-16T11:41:01Z", GoVersion:"go1.17.5", Compiler:"gc", Platform:"linux/amd64"}
Server Version: version.Info{Major:"1", Minor:"22", GitVersion:"v1.22.3", GitCommit:"c92036820499fedefec0f847e2054d824aea6cd1", GitTreeState:"clean", BuildDate:"2021-10-27T18:35:25Z", GoVersion:"go1.16.9", Compiler:"gc", Platform:"linux/amd64"}- Change directory to helm as we will use Helm charts in our deployment process:
cd helm- Creating the namespace
Use the following command to create the namespace.
kubectl create namespace besuAs you can see, we have picked “besu” as the namespace, but you can choose any name during deployment.
- Creating the genesis file with genesis chart
The genesis chart in the Besu deployment creates the genesis file and necessary keys for the validators. Genesis file is a very important JSON file that defines all the instances related to your private network. For example, token allocation, network behavior, total validators allowed, member nodes, RPC nodes, and bootnodes count, default network parameters, and other essential information. To implement all these network–wide settings, ensure that all the nodes in your network must use one genesis file. Create a JSON genesis file and then specify the genesis file by running –genesis-file command in the prompt. Further, to specify all the node-level settings and parameters, use Hyperledger Besu configuration file. The override genesis-besu.yml looks like the following:
Important: Set the release names for the initial validator pool according to the instructions given in this guide, which is validator-n, n represents the total nodes. You can choose any preferred name for the validators that you create after initial pool.
---
quorumFlags:
  removeGenesisOnDelete: true

cluster:
  provider: local  # choose from: local | aws | azure
  cloudNativeServices: false

aws:
  # the aws cli commands uses the name 'quorum-node-secrets-sa' so only change this if you altered the name
  serviceAccountName: quorum-node-secrets-sa
  # the region you are deploying to
  region: ap-southeast-2

azure:
  # the script/bootstrap.sh uses the name 'quorum-pod-identity' so only change this if you altered the name
  identityName: quorum-pod-identity
  # the clientId of the user assigned managed identity created in the template
  identityClientId: azure-clientId
  keyvaultName: azure-keyvault
  # the tenant ID of the key vault
  tenantId: azure-tenantId
  # the subscription ID to use - this needs to be set explictly when using multi tenancy
  subscriptionId: azure-subscriptionId

# the raw Genesis config
# rawGenesisConfig.blockchain.nodes set the number of validators/signers
rawGenesisConfig:
  genesis:
    config:
      chainId: 1337
      algorithm:
        consensus: qbft # choose from: ibft | qbft | raft | clique
        blockperiodseconds: 10
        epochlength: 30000
        requesttimeoutseconds: 20
    gasLimit: '0x47b760'
    difficulty: '0x1'
    coinbase: '0x0000000000000000000000000000000000000000'
  blockchain:
    nodes:
      generate: true
      count: 4
    accountPassword: 'password'
You will need to set the values of the above file as per your requirements. For example, specify the cloud provider; AWS, Azure, or any third-party cloud provider such as Zeeve-managed cloud or IBM. Also, please set cluster.provider as local and set cluster.cloudNativeServices as false.
The final configuration item here is rawGenesisConfig, which carries details about the chain you are creating. Hence, modify the parameters to match your network requirements. Once you do all these configurations, deploy the chart using the following command:
cd helm
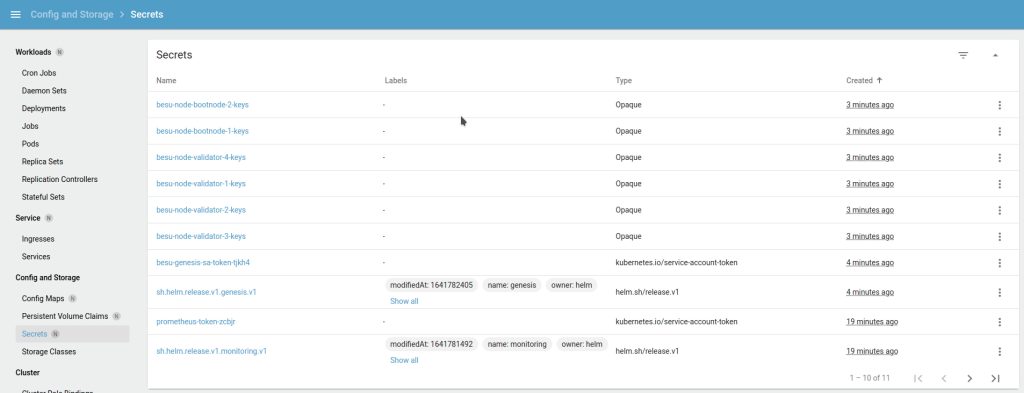
helm install genesis ./charts/besu-genesis --namespace besu --create-namespace --values ./values/genesis-besu.ymlUpon successful deployment, you can view the genesis and enodes configuration maps, followed by bootnode keys as secrets similar to the below images:

- Deploying the bootnodes
This step is optional but recommended. For a production-grade deployment, the best practice is to use two or more bootnodes. Each besu node is associated with a map that directs the Statefulset about what to deploy and how to clean up. The values.yml by default provide the following flags that are present in override files:
---
quorumFlags:
  privacy: false
  removeKeysOnDelete: true
  isBootnode: true    # set this to true if this node is a bootnode
  usesBootnodes: true # set this to true if the network you are connecting to use a bootnode/s that are deployed in the cluster

cluster:
  provider: local  # choose from: local | aws | azure
  cloudNativeServices: false
  reclaimPolicy: Delete # set to either Retain or Delete; note that PVCs and PVs will still exist after a 'helm delete'. Setting to Retain will keep volumes even if PVCs/PVs are deleted in kubernetes. Setting to Delete will remove volumes from EC2 EBS when PVC is deleted

aws:
  # the aws cli commands uses the name 'quorum-node-secrets-sa' so only change this if you altered the name
  serviceAccountName: quorum-node-secrets-sa
  # the region you are deploying to
  region: ap-southeast-2

azure:
  # the script/bootstrap.sh uses the name 'quorum-pod-identity' so only change this if you altered the name
  identityName: quorum-pod-identity
  # the clientId of the user assigned managed identity created in the template
  identityClientId: azure-clientId
  keyvaultName: azure-keyvault
  # the tenant ID of the key vault
  tenantId: azure-tenantId
  # the subscription ID to use - this needs to be set explictly when using multi tenancy
  subscriptionId: azure-subscriptionId

node:
  besu:
    metrics:
      serviceMonitorEnabled: true
    resources:
      cpuLimit: 1
      cpuRequest: 0.1
      memLimit: "2G"
      memRequest: "1G"
Make the necessary modifications related to awz, azure, and cluster. Specifically for the bootnodes, set quorumFlags.isBootnode: true. Moreover, you have to set quorumFlags.usesBootnodes: true, which signifies that all the nodes in the network use the same bootnodes. Regardless of the node type (which can be validators.yaml, txnode.yaml or reader.yaml) you must set quorumFlags.usesBootnodes: true in the values.yaml’s override values.
- Deploying the validators
Validators contribute to the block creation as when the majority of validators are peered together, it leads to the creation of blocks on the chain. Considering the best practices, we will deploy four validators. Set the node flags for the initial validator pool to false, and then deploy all the validators:
helm install validator-1 ./charts/besu-node --namespace besu --values ./values/validator.yml
helm install validator-2 ./charts/besu-node --namespace besu --values ./values/validator.yml
helm install validator-3 ./charts/besu-node --namespace besu --values ./values/validator.yml
helm install validator-4 ./charts/besu-node --namespace besu --values ./values/validator.yml- Add or remove validators to the pool
For every validator you add/remove from the initial validator pool, you need to deploy an RPC node and vote for the node to include in. The node will become a validator only when the vote API call is made from the majority of the existing validator pool. Refer to the Ingression Section to get details on making vote API calls from your local machine or equivalent device.
- Deploy the RPC and Transaction nodes
An RPC node in Besu network deployment is a node that simply performs public transactions or carries out heavy transactions when connected to blockchain explorers. The override in values.yml for Stateful is identical to the validators above, so we will create the node’s key before the node starts. Use the following command to deploy an RPC node:
helm install rpc-1 ./charts/besu-node --namespace besu --values ./values/reader.ymlA member node, also known as a transaction manager, functions in line with a Private Transaction Manager like Tessera that is responsible to allow private transactions between all the nodes of the network.
Again, the transaction/override values.yml for the Stateful is identical to the validators, but it has quorumFlags.privacy: true to signify that the transaction node deploys a pair of GoQuorum and Tessera nodes. Use the following command to deploy a member node:
helm install member-1 ./charts/besu-node --namespace besu --values ./values/txnode.yml- Interacting with the node from your local machine
To view the Grafana dashboard or to make transactions using your local machine, you first need to deploy an ingress controller along with the rules. Here, we are using an ingress controller ingress-nginx that you can deploy as the following:
helm repo add ingress-nginx https://kubernetes.github.io/ingress-nginx
helm repo update
helm install quorum-network-ingress ingress-nginx/ingress-nginx \
    --namespace quorum \
    --set controller.ingressClassResource.name="network-nginx" \
    --set controller.ingressClassResource.controllerValue="k8s.io/network-ingress-nginx" \
    --set controller.replicaCount=1 \
    --set controller.nodeSelector."kubernetes\.io/os"=linux \
    --set defaultBackend.nodeSelector."kubernetes\.io/os"=linux \
    --set controller.admissionWebhooks.patch.nodeSelector."kubernetes\.io/os"=linux \
    --set controller.service.externalTrafficPolicy=Local
You can use the pre-defined rules given to seamlessly test the functionality and make modifications to align with your network requirements. After you do all the settings, deploy the rules using the following command:
kubectl apply -f ../ingress/ingress-rules-besu.yml
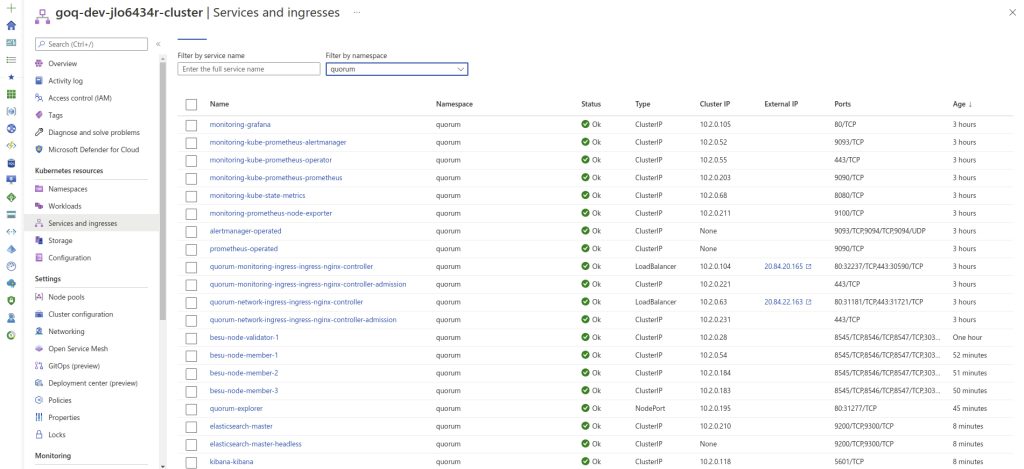
Upon completion, you can see the IP address under the Ingress section only if you use Kubernetes Dashboard. If not, use the command line kubectl -n quorum get services quorum-network-ingress-ingress-nginx-controller to view the IP addresses. See the example below:
In order to confirm that your node running the JSON-RPC service is synchronizing properly, make the following RPC calls:
Curl HTTP request
curl -v -X POST -H "Content-Type: application/json" --data '{"jsonrpc":"2.0","method":"eth_blockNumber","params":[],"id":1}' http://<INGRESS_IP>/rpcJSON result
{
"jsonrpc" : "2.0",
"id" : 1,
"result" : "0x4e9"
}
Conclusion
By following the steps mentioned in this guide, you can easily deploy and manage a private Hyperledger Besu network on Kubernetes. However, this is an idea of how you can set up a network in your local machine and experiment with Besu. As for production-level deployment, you need to follow some best practices that Zeeve can help you with.
Also, Zeeve allows you to deploy the Besu network via a quick, low-code way. Along with smooth, 2-minutes deployment, the platform enables you to leverage proactive monitoring of nodes, alerts & notifications about potential issues, a non-custodial form of staking, and much more. Visit Zeeve and start your Hyperledger Besu journey today. Want to explore some other permissive protocols? Need help? Connect with our blockchain experts today to learn more about how Zeeve can transform your development experience.