

Polygon zkEVM is a preferred choice for prominent dApps such as QuickSwap, Celer cBridge, and Coinstats because of its ability to offer a fully Ethereum-equivalent zero-knowledge ecosystem for near-infinite scalability, reduced gas fees, and interoperability. If you are planning to build your dApp on the Polygon zkEVM ecosystem, this article provides a step-by-step process for deploying a smart contract on the Polygon zkEVM.
Why choose Polygon zkEVM for your dApps?
Polygon zkEVM is a zero-knowledge based Layer-2 rollup scaling solution designed to offer massive scalability while maintaining enterprise-grade security, interoperability, and quick finality for the decentralized applications running on its ecosystem. Powered by cryptographic zk-proofs, Polygon zkEVM computes all the transactions off-chain, produces validity proofs, and publishes them on the mainnet. With this innovative approach, Polygon zkEVm allows dApps to maintain EVM-equivalency, inherit security from the underlying Layer-1, and leverage ZKP-powered scalability.

Learn more on: How Polygon zkEVM is becoming a game changer for decentralized applications?
Building and deploying smart contract on Polygon zkEVM
There are multiple ways to deploy a smart contract on the Polygon zkEVM ecosystem. For example, you can deploy using Hardhat, Foundry, and Remix. For this guide, let’s consider Remix IDE-based deployment.
Prerequisites
System requirements:
RAM: Minimum- 32 GB, recommended- 64GB.
CPU: Minimum- 8-core, recommended- 16-core.
Storage: at least- Minimum 2.5TB SSD, recommended 5TB SSD
Recommended bandwidth- 1Gbit/s
Node- zkEVM full node.
Wallets– Any Polygon zkEVM-compatible wallet like Metamask or Coinbase wallet.
Tools- Remix.IDE for development, testing, debugging, and deployment of Polygon zkEVM smart contract. Polygon zkEVM block explorer for checking the transactions.
Assuming that you have all the prerequisites, let’s start the deployment process.
Note that these steps represent Polygon zkEVM testnet deployment. You can follow exactly the same steps for deploying smart contracts on Polygon zkEVM Mainnet..
Step:1 Configuring the Polygon zkEVM Network
To deploy your dApp on Polygon zkEVM, you first need access to the network. To do this, you need a RPC endpoint, which you can either deploy through the traditional programming-based process or the no-code way.
Zeeve allows you to deploy Polygon zkEVM node via low-code, do-it-yourself method within a few clicks. Plus, the node infrastructure at Zeeve is highly optimized for load balancing, 10x faster response time, rapid synchronization, and 99.95% uptime.
Once your node is deployed, you will get a public RPC url and chain ID. Add all these details to your Metamask wallet, including the testnet explorer url; https://testnet-zkevm.polygonscan.com.

Click on Save to add Polygon zkEVM Network to your wallet’s network list. Reload the page and navigate to the ‘Select a network’ option from the wallet. A drop-down menu with all the added networks will appear. Select Polygon zkEVM testnet and switch to the network.
Step:2 Funding your Metamask wallet with test tokens
Now that you have configured the Polygon zkEVM network is configured, it’s time to fund your wallet with some test tokens. These tokens will be used to pay smart contract transaction fees during the deployment process. Before you request tokens, ensure that you are a member of Polygon discord server, because it needs authentication. Now, to get test tokens, navigate to the Polygon zkETH Faucet, select Polygon zkEVM as network, select token-type, and add wallet address.
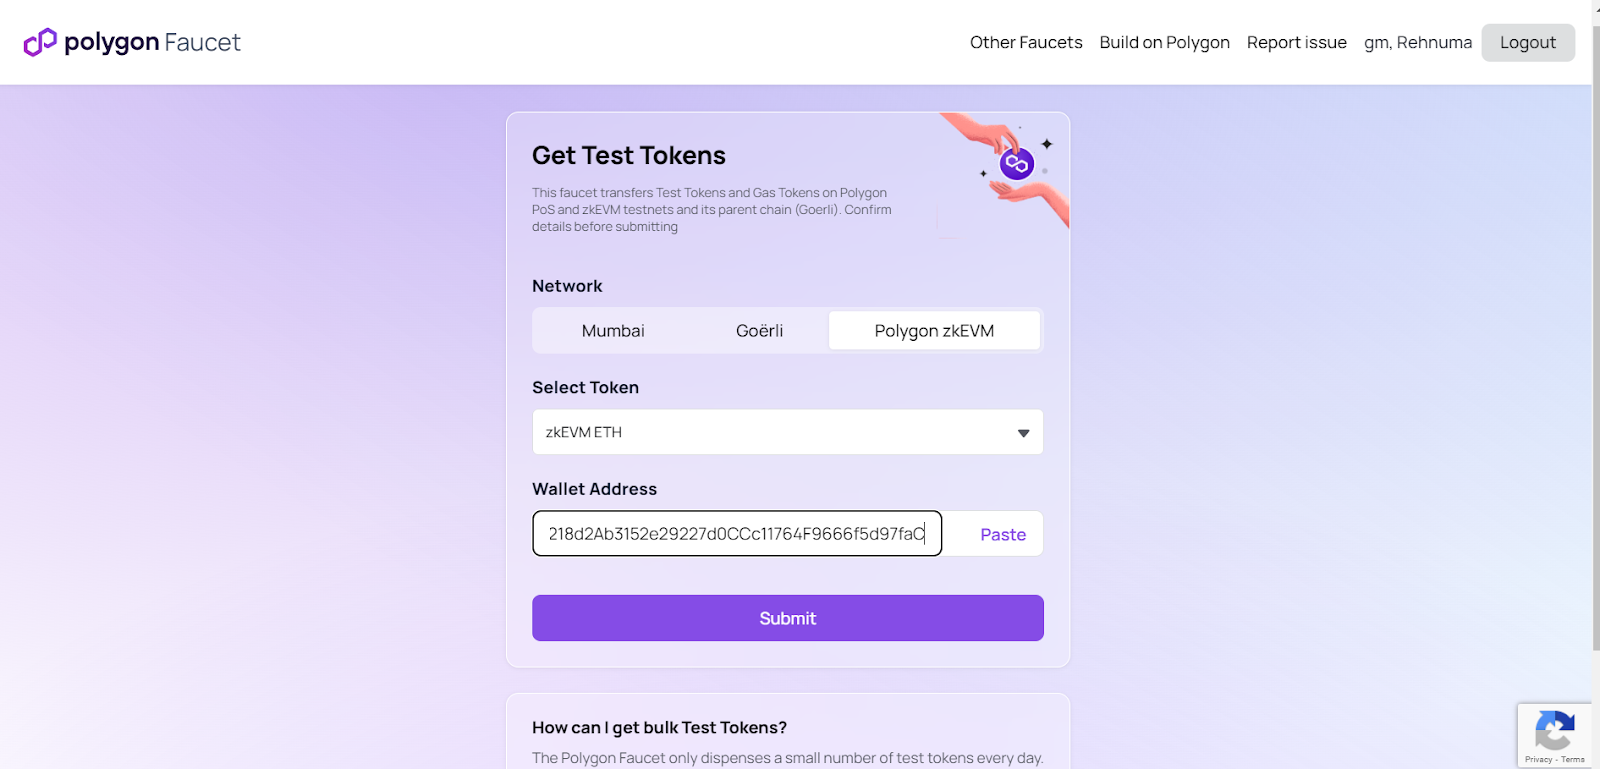
Click on ‘Submit’. The faucet will now ask you to confirm the details once again. After that, ETH will be transferred to your wallet within 5 minutes. If you want, you can check the transaction details on the explorer.

Step:3 Building the Smart contract
The next step is to create the smart contract. For this guide, let’s build a card game-related contract similar to the popular game like Blackjack or 21. Here, the player’s objective is to obtain a hand of cards with total value close to 21 without overcalling.
The key functions of our smart contract code include:
- CardValue Struct: Defines properties of a playing card, such as its symbol (suit), card (rank), and weightage (numerical value).
- Mapping and Arrays: The contract has a mapping– ‘deck’ that associates each card index with its CardValue. Plus, it includes arrays for the card ranks, their associated weightage values, and the card suits.
- Card Deck Initialization: The contract initializes the deck of cards by iterating across the card rank’s arrays and suits, creating a deck of 52 cards with their weightage values.
- pickCardFromDeck Function: This function generates a random card index based on a combination of the caller’s address and the current block’s timestamp. Hence, it returns a random card index between 0 and 51.
- hit Function: This function represents a player drawing a card from the deck. It uses the pickCardFromDeck function to select a random card, adds it to the player’s hand array, and logs the drawn card’s rank and suit. Plus, this function also determines the current total value of the player’s hand and logs whether the player has won (reached 21), lost (exceeded 21), or should continue the game.
- readHandValue Function: This function calculates and returns the total weightage of the player’s hand by determining the weightage values of the cards in their hand. It also logs the total weightage in the hand.
The below smart contract is just an example. You can write your own dApp-specific smart contract, such as for DeFi app, crypto gaming app, bridges, wallet, etc, and deploy it to the Poygon zkEVM using these same methods, just the contract code will change.
// SPDX-License-Identifier: GPL-3.0
pragma solidity >=0.7.0 <0.9.0;

import "hardhat/console.sol";

contract Casino {

    struct CardValue {
        string symbol;
        string card;
        uint8 weightage;
    }

    mapping (uint => CardValue) deck;

    string[] cards = ["ace", "king", "queen", "jack", "10", "9", "8", "7", "6", "5", "4", "3", "2"];
    uint8[13] weightage = [10, 10, 10, 10, 10, 9, 8, 7, 6, 5, 4, 3, 2];
    string[] suits = ["spades", "hearts", "diamonds", "clubs"];

    CardValue[] hand;

    constructor() {
        uint16 DeckIndex=0;
        for (uint16 cardIndex = 0; cardIndex < cards.length; cardIndex++)
        {
            for (uint16 suitIndex = 0; suitIndex < suits.length; suitIndex++)
            {
                deck[DeckIndex] = CardValue(
                    {
                        symbol: suits[suitIndex],
                        card: cards[cardIndex],
                        weightage: weightage[cardIndex]
                    }
                );
                DeckIndex++;
            }
        }
    }

    function pickCardFromDeck() internal view returns(uint) {
        uint randNo = 0;
        randNo = uint (keccak256(abi.encodePacked (msg.sender, block.timestamp)))%52;
        return randNo;
     }

    function hit() public {
        CardValue memory drawnCard = deck[pickCardFromDeck()];
        hand.push(drawnCard);
        console.log("Your new card is -", drawnCard.card, "of", drawnCard.symbol);
        if (readHandValue() == 21) {
            console.log("You've won");
        } else if (readHandValue() > 21) {
            console.log("You have lost");
        } else {
            console.log("Would you like to hit again?");
        }
    }

    function readHandValue() public view returns(uint16) {
        uint16 cardWeightage = 0;
        for (uint16 cardIndex = 0; cardIndex < hand.length; cardIndex++)
        {
            cardWeightage += hand[cardIndex].weightage;
        }
        console.log("Total Weightage =", cardWeightage);

        return cardWeightage;
    }

}
Open Remix IDE, click on WORKSPACES and then create a new workspace by clicking on +create option. Within this workspace, create a new file and let’s name it Newcardgame.sol.
Next, paste the above smart contract code into the file.
Note that the above code is not fully compiled. Therefore, let’s first compile this in Solidity. Paste the entire code into the Remix console, run the ‘Solidity Compiler’ (as you can see in the below image). You will see a green check mark, upon successful compilation.

Step:4 Deploying the Smart contract on Polygon zkEVM
Finally, let’s deploy the compiled Solidity smart contract on the Polygon zkEVM testnet. Navigate through the ‘Deploy & Run Transactions’ tab on the Remix and add all the essential details such as Environment, Account address, Gas limit configuration, etc.
For our setup, we have added the following details:
- Environment: Injected Provider- MetaMask.
- Account address: 0x218d2Ab3152e29227d0CCc11764F9666f5d97faC.
- Gas limit is set to default, 3M.
- The contract name will appear automatically, which is ‘Casino-New card game. Sol’ in our case.

Click on ‘Deploy’ and confirm the transaction from your Metamask wallet. Once confirmed, the contract will be deployed in a few seconds. Also, as you can see in the below image, an output representing the successful smart contract transaction will appear at the bottom of the Remix console with a green check mark.

And, that’s done! Congratulations on successfully deploying the smart contract on Polygon zkEVM. For further verification of deployment, you can check the transactions on the Polygon zkEVM block explorer.
Step:5 Calling functions from the deployed smart contract
Let’s test our Polygon zkEVM smart contract by calling some of its functions. For example, we are calling ‘hit’ and ‘readHandvalue’ functions listed at the bottom of the Remix.IDE console.
Click on hit to call this function. It will draw additional cards and check if you win or lose. The result will appear in the console.

Similarly, click on readHandvalue to call this function. This determines the game’s outcome by checking the total weightage. If the hand value touches 21, it’s a win; if it exceeds 21, it’s a loss. Again, the results will appear in the console.

As you can see, we just interacted with our Polygon zkEVM smart contract by calling some of its functions! You can call more functions, make changes in the code, or re-deploy this contract to offer more specific dApp functionalities.
Wrapping Up
As discussed, you can build and deploy smart contracts on Polygon zkEVM for your project-specific dApps using these same steps. And, if you come across any challenges or you have any questions, feel free to connect with blockchain experts at Zeeve. We are committed to simplifying your Polygon zkEVM-based deployment with scalable nodes, secure RPC endpoints, ready plugins, multi-cloud support, and 24*7 resource monitoring. For more details about how Zeeve is enabling seamless deployment of Polygon zkEVM dApps, drop us an email or schedule a one-to-one call for a detailed discussion.
