While many advanced blockchains exist in the web3 space, DComm excels in facilitating a highly secure and scalable blockchain ecosystem for real-world assist tokenization. And with the tokenization market reaching $5.6 billion, DComm opens up excellent investment opportunities for blockchain investors, institutions, and crypto enthusiasts.
Like every other blockchain, DComm requires potential validators to run staking/validator nodes on the network’s ecosystem. This guide explains setting up and running a DComm validator node through a hassle-free, low-code approach. We’ll talk about the DCOMM blockchain, the network’s modus operandi, validator requirements, benefits & eligibility, followed by a step-by-step process of running a DCOMM validator node.
How DComm works
DComm is based on a thoughtfully architectured, innovative blockchain platform that makes real-world asset tokenization and DeFi operations effortless with infinite scalability, speed, security, low cost, and interoperability.
DComm addresses the challenges arising from the convergence between the physical and digital world in tokenization. Also, it solves the problems related to identity, compliance, and governance. To do this, DComm offers a tokenization-focused plus DeFi-optimized ecosystem infrastructure integrated with ultra-fast, low-cost, and excellent scalability features.
The network implements three different chains running independently with their own consensus and ecosystem rules yet functioning together to provide a real-world asset infrastructure to the DComm blockchain. Gain a better insight into how DComm works with the given image:
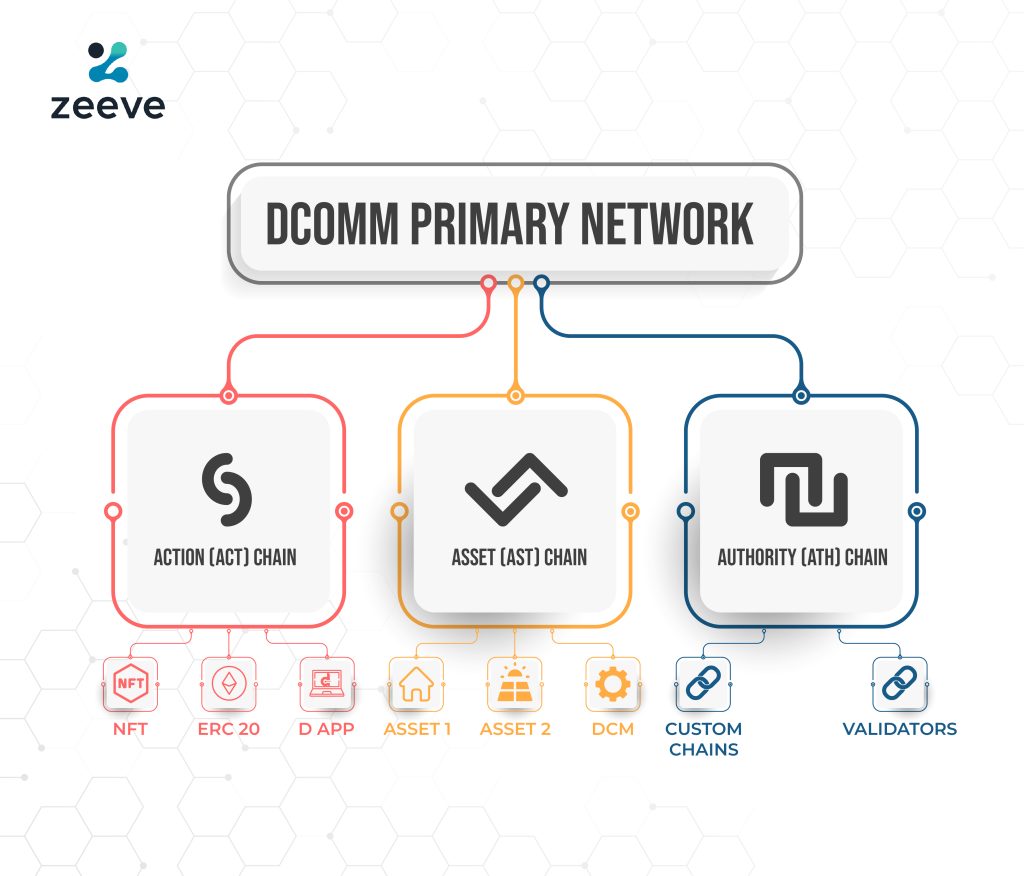
Primary Network
The main network is responsible for validating DComm’s built-in blockchains- ACT chain, AST chain, and ATH chain. Members of this network must stake DCM tokens to secure their participation.
Action (ACT) Chain
The Action chain is based on Ethereum Virtual Machine (EVM), allowing developers to deploy smart contracts and connect to the dApps.
Asset (AST) Chain
The Asset chain is based on the DComm virtual machine (DVM) that enables the creation and trading of digital assets and allows developers to interact with various DComm chains.
Authority (ATH) Chain
The authority chain is based on the Authority Virtual Machine (AVM) that focuses on coordinating validators and keeping track of various active validators while enabling L1 (Formerly known as Zeeve) creation. Therefore, investors and institutions looking must focus on this chain.
What do you get as validators on DComm?
Enterprises and blockchain enthusiasts can easily become DComm validators by running a DComm staking node and then adding the node to the validator set using the DComm wallet or with DCommJS, whichever is feasible.
In line with validators, DComm appoints ambassadors, verified and authenticated individuals working as DComm community-approved advocates. Potential validators on DComm must be validated and approved by DComm ambassadors.
Once qualified, Validators on the DComm blockchain is part of the ‘validator program’, and they are entitled to leverage the following benefits:
Staking rewards- DComm provides validators with staking rewards based on the $DCM they stake and the staking duration.
Delegation fees- Validators earn a certain percentage of the delegators’ reward for staying consistently online and validating the blocks (transactions) as expected.
Participation in DAO- Validators on DComm have the right to vote on the network’s on-chain governance. They can participate in vital ecosystem-related decisions, propose changes to the existing rules, and mark their contribution.
Running a validator means you need to have extensive technical exposure around multiple blockchain networks, and you are vigilant round the clock for security and DevOps of your nodes.
However, with Zeeve, any investor or institution having no technical skills can run a validator node via a low-code approach. Once the node is active, it can start staking to earn rewards and maximize the yield. To be a DComm validator, you must fulfill the following staking parameters.
- Stake at least 2,000 DCM (10,000 DCOM for the GoldCoast TestNet) on the DCOmm mainnet.
- Choose at least 2 weeks of delegation period.
- Select a minimum of 2% delegation fees. This fee can even be 100%, which indicates that delegators’ participation is not required in the process of validation; the node will handle it alone.
How to run a validator node on DComm via a low-code approach
Let’s start with DComm validator node deployment via a low-code approach on the Zeeve platform. You can choose a coding-based approach, which requires you to run a dedicated DComm node and then add the node to the validator set.
The instructions in this guide represent TestNet deployment. You can follow these similar instructions to deploy your validator node on the DComm MainNet. Zeeve offers no-code deployment for all types of blockchain nodes; UTXO-based, EVM, and Cosmos-based.
To run a staking node on DComm, you must first access the DComm wallet. You can either access your existing DComm wallet or create a new wallet. After successful login into the wallet, switch to GoldCoast (DComm TestNet) to proceed with the node deployment.
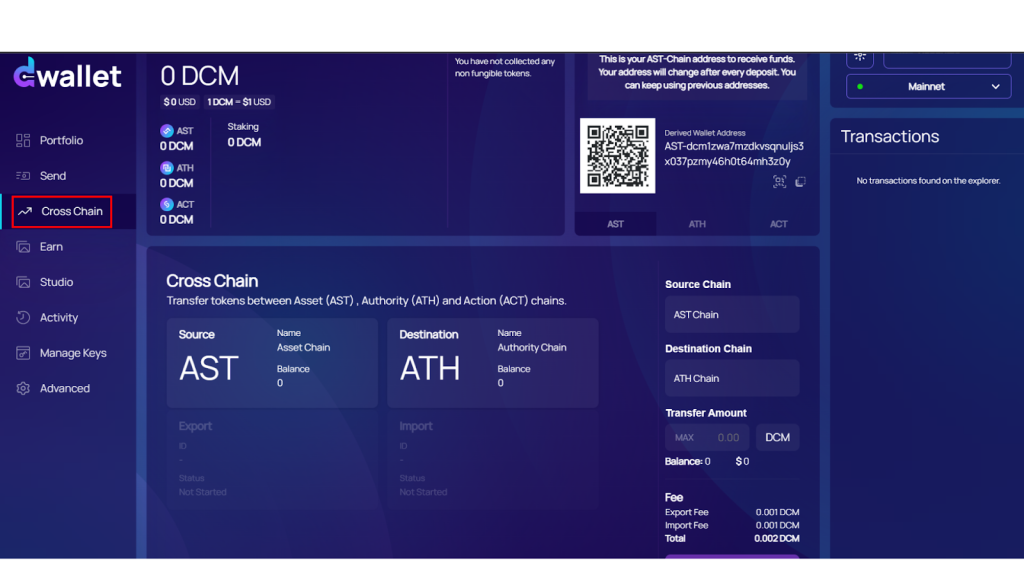
Now, connect your wallet to the DComm testnet faucet and request test tokens. Note that staking requires at least 10,000 DCM on the ATH chain. If you do not have sufficient tokens on the ATH chain, you can quickly import tokens from the AST or ACT chain via the quick cross-chain transfer feature available on the wallet.
We will deploy the DComm node using the Zeeve platform. If you are new to Zeeve, sign up or log in with your authorized credentials. The Zeeve dashboard allows you to buy staking nodes or manage your existing nodes. In this guide this guide explains setting up new DComm staking nodes.
- Go to ‘Staking Nodes’ located under the ‘Buy Services’ to see different blockchain protocols. Click on DComm to land on a page that asks you to provide node subscription details such as cloud type, node type, and desired number of nodes to buy, as explained in the image below.

- Click on ‘Subscribe’ to complete the payment. Add a new DComm network from ‘Staking Nodes’ under Manage Services.
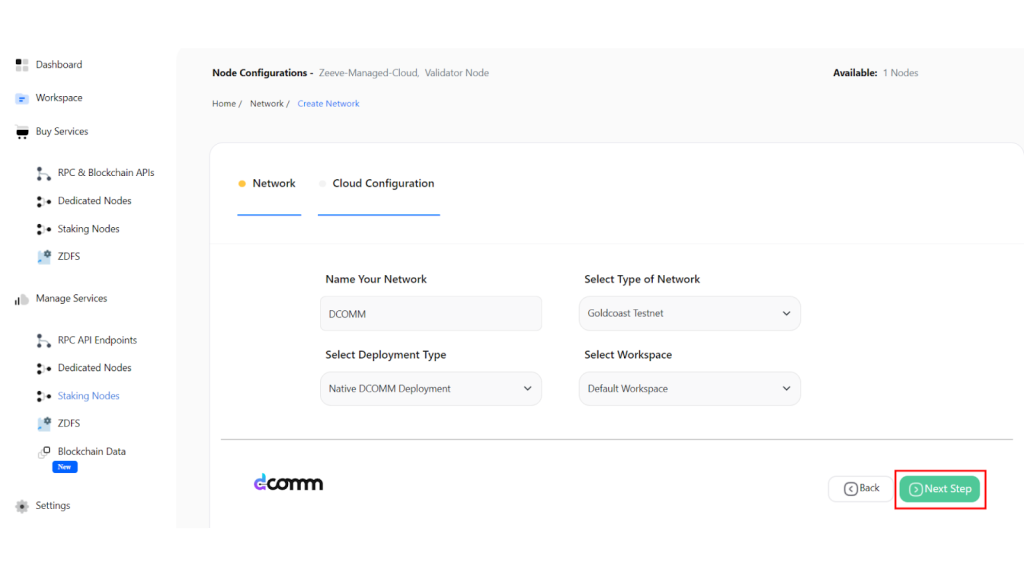
Add network-related basic details like:
- Name of your network
- Type of network – Tetsnet or Mainnet
- Deployment type and workspace
- Next, select a region-specific to your DComm node’s location. For example, we have selected ‘asia-east-1’ as seen in the image below. Click on ‘Create’ to complete the node creation.
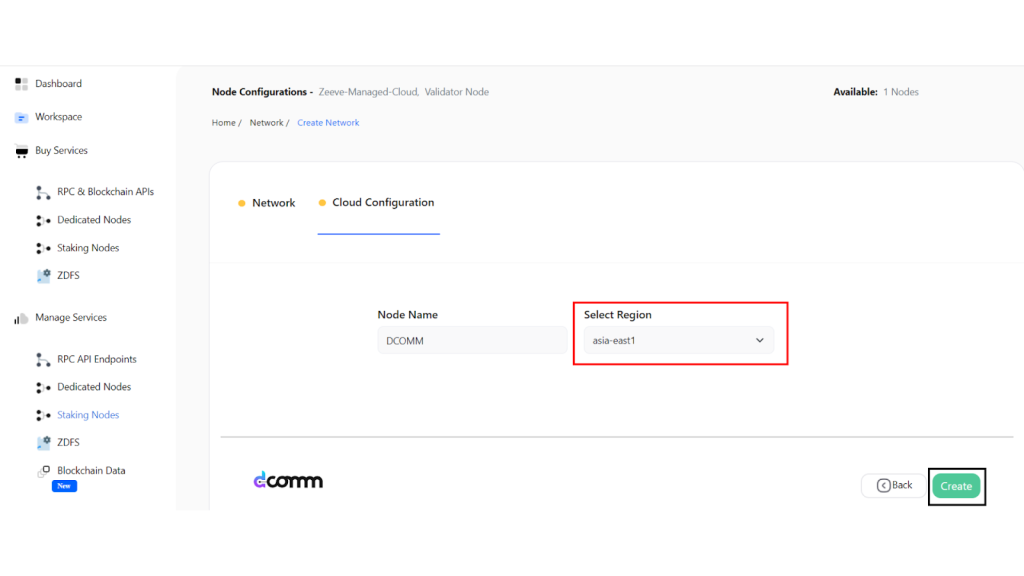
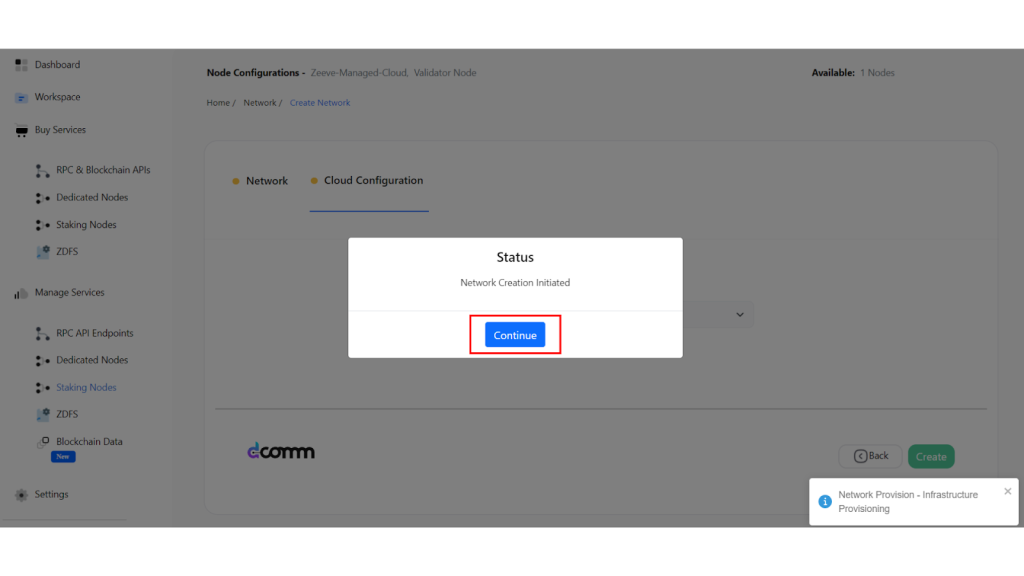
This action will initiate the node creation. Wait a few hours and let the node sync to the current block height.
- Again, go to ‘Managed Services’ — ‘Staking nodes’ to see the progress of your node synchronization and, meanwhile, copy the validator node ID from the portal. Later, we will use this ID to run the staking node with the DComm wallet we have created and set up.
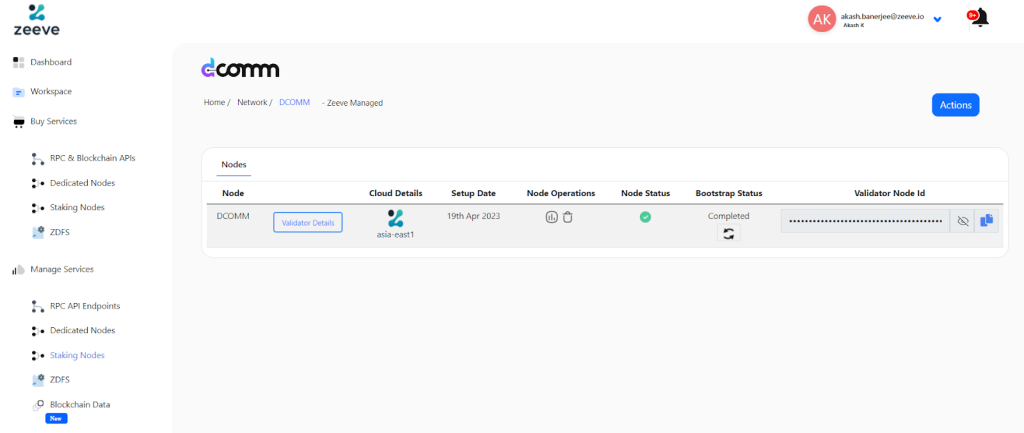
As you can see in the image, the node status is active. On the same page, when you click ‘validator details’, a dashboard will open that shows vital real-time analytics of your validator node such as peer count, delegators, stake amount, reward staking percentage, and more. Let’s briefly understand these performance-related parameters one-by-one:
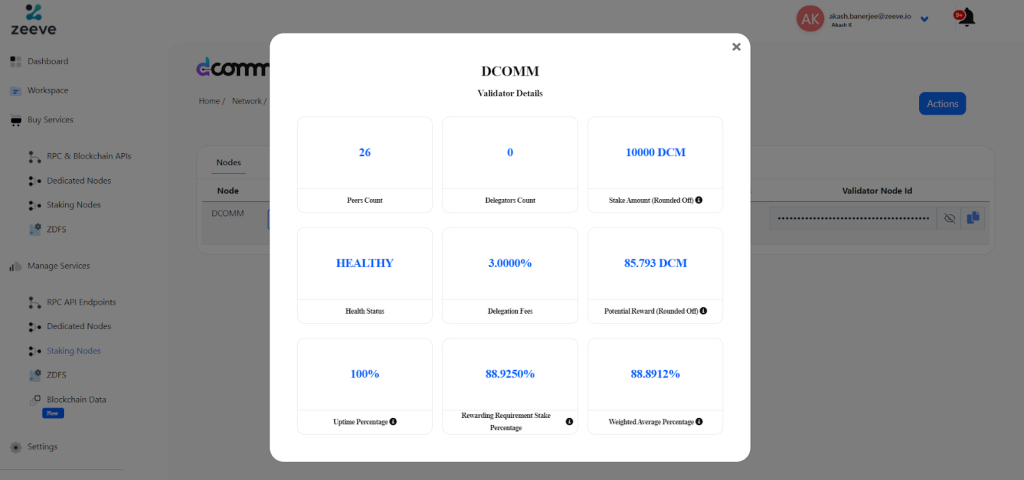
Peer count– Total peers containing IP address of your staking node.
Delegators count- Total delegators who participate in staking through existing validator nodes.
Stake Amount- Total tokens you have staked to become the validator.
Health status- Defines health of your node; Healthy in our case.
Delegation fees- Percentage of delegation fee you have selected
Potential reward- Estimated rounded-off reward you can earn through staking.
Uptime- Uptime status of your validator node.
Rewarding requirement stake percentage- Percentage of stake that determines your validator node is above the uptime requirement.
Weighted Average percentage- Average uptime of all your stakes placed during the selected staking period.
Also, the dashboard hardware-related analytics of your validator node, including CPU status, RAM used, Swap used, and Root FS used, along with memory stack, network traffic, and total disk space utilized for the node.

Running Staking Node
Open the DComm wallet interface – go to ‘Earn’ in the side panel. A form will appear. Fill in the node ID that we copied from Zeeve’s DComm node portal, followed by the Staking Amount (minimum of 10,000), Desired Staking Start Date, Staking end date, and Delegation fee rate (should be more than 2%). After that, confirm the validation transaction to lock your tokens into Staking and earn rewards.

Based on your inputs, suggestions will appear along the form showing maximum delegation amount, staking duration, and your estimated rewards out of the staking. However, the reward can vary according to the fluctuation in DCM value. Click on ‘Confirm’ to start the staking process.
Read: Ready to launch your Polkadot validator without touching a single line of code? — Start your no-code journey with Zeeve today.
Wrapping up
Congrats on successfully deploying your DComm validator node and staking with it. Immediately after the staking process begins, you can start earning rewards from it. With Zeeve, a no-code node deployment platform, enterprises, developers, and even a non-tech individual can deploy all types of nodes — dedicated, full node, and validator nodes in a few clicks.
Zeeve’s powerful node infrastructure supports a purely non-custodial wallet staking that does not require us to access your private key, sensitive credentials, or funds. You maintain full ownership while we manage and improve the underlying node infrastructure. Additionally, we offer end-to-end monitoring of nodes in real-time, producing vital analytics to keep your nodes in pristine condition for high-end performance.
To learn more about DComm node deployment or discuss your project requirements, schedule a quick call with our web3 experts and understand how we can simplify your DComm blockchain experience.