Documentation
Introduction
Welcome Docs 2.0
Choose Version
Unstable Version
v 1.0
v 2.0
v 2.1 beta
v 1.5 stable ver.
COMMON STRUCTURES
Before you begin
Set up Development
Build the basic
Install your app
DATA ATTRIBUTES
Data attribute model
Create a data attribute
Update a data attribute
List All Data Attributes
Welcome to Docs 2.0
by Marissa Lynch ![]() Last updated : Mar 10, 2020
Last updated : Mar 10, 2020
Welcome to Zeeve API! This tutorial will help you learn the basics of using Atlassian Connect to develop apps for Zeeve Cloud, including Jira Software, Ehya Service Desk, and Ehya Core. Designspace Connect is our recommended framework for extending Ehya Cloud as it handles discovery, installation, authentication, and seamless integration into the Ehya user interface.
By the end of this tutorial you’ll have everything you need to start developing for Cloud. This includes setting up your local development environment for Designspace Connect, getting a Cloud development instance, and validating your setup by building and deploying a basic Hello World app.
Note, this tutorial is for developing on Ehya Cloud. If you want to develop for Server then checkout the Getting started guide for server app development.
Before you begin
You’ll need the following things to develop for Zeeve Cloud:
A developer instance of Atlassian Cloud for testing and validating apps.
A local development environment for creating apps.
Step 2. Enable development mode
Now we’ll enable development mode for your Design space Cloud instance. Development mode gives you the ability to install apps that are not from the Atlassian Marketplace.
1. Navigate to Ehya settings (cog icon) > Apps > Manage apps.
2. Scroll to the bottom of the Manage apps page, and click Settings (1).
3. Select Enable development mode (2), and click Apply.
Zeeve
- Add ons
Find more Add-ons
Manage Add-ons
Apps Manegement
Account
Step 2. Enable development mode
If you install an Atlassian Connect app in an Atlassian Cloud instance, the app is usually hosted elsewhere (for example, a cloud platform service like Heroku). However, when you are building an app it’s easiest to develop it on your local machine and make it available over the internet using tunneling (via HTTPS). This allows you to work locally, but test against your Atlassian Cloud instance.
1. On your command line, run the following:
npm install -g ngrok
1
2. Verify that ngrok is installed correctly by running the following command:
npm install -g ngrok
2
We’ll show you how to use ngrok to make your app available to the internet later in this tutorial.
Build a Basic App
Now let’s build a simple Designspace Connect app. This part of the tutorial gives you a hands-on introduction to Designspace Connect and validates that your development environment is set up correctly.
Let’s create a project directory and define your app descriptor. The app defined in the sample code below uses a generalPages module, and adds a link titled Greeting to the Ehya sidebar.
1. Create a project directory for your app’s source files. 2. In the project directory, create a new file named atlassian-connect.json with the following contents:
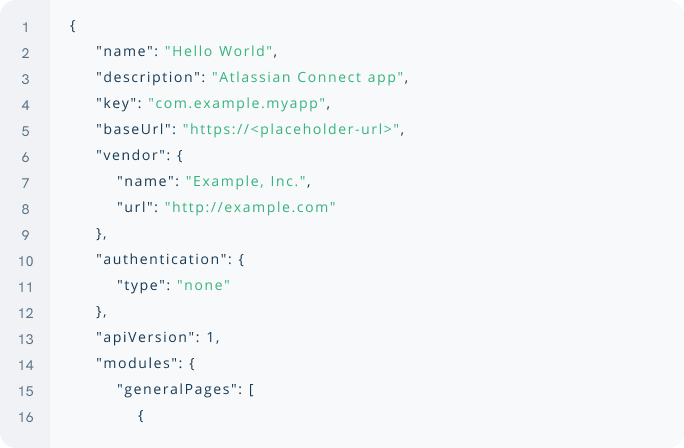
3. Save the descriptor file.
4. (optional) Validate your descriptor using the Designspace Connect validator. This handy tool shows you any errors in your app descriptor, such as missing properties or syntax errors.
Make the app files available to the internet
Now that your app is hosted on a local web server, let’s use ngrok to make it available over the internet.
You’ll see a status page on your command line that shows the public URL of your tunnel and other information about connections made over your tunnel. If your app is not running when you try to start ngrok, you’ll see a “Failed to complete tunnel connection” message.
Zeeve Live API
(Ctrl+C to quit)
Session Status
Session Expires
Version
Region
Web Interface
Forwarding
Connections

Online
7 hours , 72 minutes
3.1.8
United Status (us)
http://120.0.0.1.8712
http://4151yua.ehya.io —> localhost : 6000
ttl opn rt1 rt5 p50 p90
0 0 0.00 0.00 0.00 0.00
Install and test your app
We’re nearly there! The final step in deploying your app is to install it in your Atlassian Cloud instance. You’ll do this by adding a link to your app’s descriptor file from your Atlassian Cloud instance. This allows Jira to install your app.
1. Navigate to zeeve in your Atlassian Cloud instance, then choose Ehya settings (cog icon) > Apps
2. Click Upload app
3. Click Greeting. The Hello World message displays.
Congratulations! You’ve set up a development environment and built your first app.
Join the Our Largest community!
Be one of the 15,000+ innovators who subscribe to our updates.

Zeeve is a platform with robust Blockchain core infrastructure that allows businesses to set-up their own Blockchain ecosystem.
Contact Info
USA: 395 Santa Monica place, Unit 308, Santa Monica, California, 90405
Phone: +99 (0) 101 0000 888
Email: Info@zeeve.com
Quick Links
Quick Links
© 2021 Artora . All rights reserved